The best pergola for Canada isn’t about choosing a material, but engineering a complete, resilient outdoor system.
- True weather resistance comes from deep footings and engineered snow-load capacity, not just the surface material.
- Creating a true “outdoor room” depends more on strategic placement, dynamic roofing, and integrated privacy than on the choice between wood and metal.
Recommendation: For a low-maintenance, four-season architectural extension of your home, prioritize a fully-engineered aluminum system as the superior structural backbone.
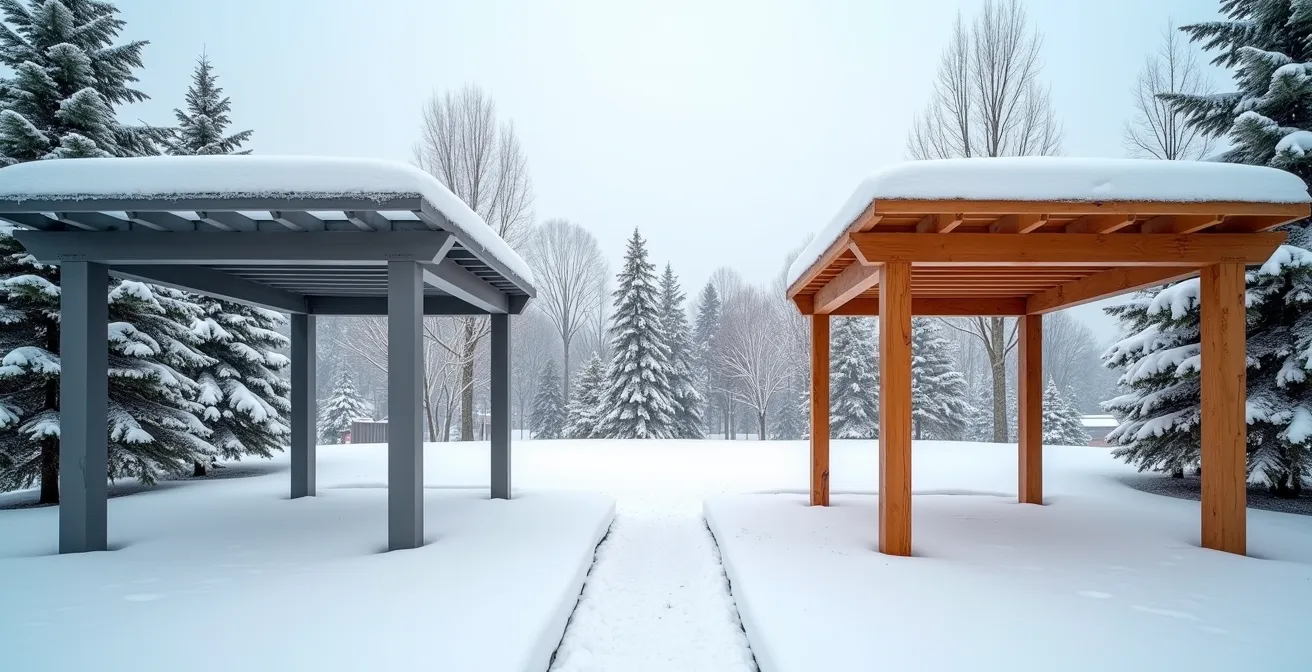
For Canadian homeowners, the dream of extending living space outdoors is a powerful one. It’s the vision of a perfect outdoor room for summer entertaining, a cozy nook on a crisp autumn evening, or a sheltered spot to watch the first snowfall. The conversation often begins with a simple question: aluminum or cedar? While cedar offers natural beauty and aluminum boasts modern durability, this debate misses the bigger picture. Viewing a pergola as a simple garden feature is the first mistake. To create a space that truly endures and enhances your home through punishing Canadian seasons, you must think like an outdoor designer.
The real key to a successful project lies not in the surface material, but in the system engineering. A pergola is an architectural extension of your home, and its value is measured by its resilience and functionality year-round. This means shifting focus from the simple aesthetic choice to the critical, often invisible, components: the adjustable roof that handles rain and snow, the deep footings that defy frost heave, the strategic placement that maximizes light, and the legal framework that prevents a teardown order. The market is already reflecting this shift, with a projected 5.3% CAGR growth in the North American pergola industry, driven by demand for more sophisticated, integrated solutions.
This guide will walk you through the essential engineering and design considerations for creating a lasting outdoor room. We will deconstruct the pergola into its core systems, moving beyond the aluminum versus cedar surface debate to equip you with the knowledge to invest in a structure that performs as beautifully as it looks, year after year.
Summary: Building a Resilient Outdoor Room in Canada
- Why adjustable louvered roofs are the game changer for rain protection
- How to secure a pergola to a patio without it flying away in a windstorm?
- Where to place your pergola to block summer sun but allow winter light?
- The zoning mistake regarding “accessory structures” that forces you to tear it down
- How to integrate slats or curtains to block the neighbor’s view?
- How to maintain privacy in floor-to-ceiling window homes without ruining the view?
- How to read a city’s “Official Plan” to know where density is legally mandated?
- How to heat an outdoor covered patio to make it usable at -5°C?
Why adjustable louvered roofs are the game changer for rain protection
The single most transformative innovation in modern pergolas is the adjustable louvered roof. This technology elevates the structure from a simple shade provider to a piece of dynamic shelter, capable of responding to changing weather in an instant. Unlike a fixed cedar lattice that offers partial shade or a solid roof that permanently blocks light, an adjustable system gives you complete control. You can angle the louvers to catch the morning sun, close them completely for a watertight seal during a summer downpour, or open them fully to gaze at the stars.
For Canadian homeowners, this versatility is paramount. It means an unexpected rain shower no longer sends guests running indoors. It creates a reliable, dry space for outdoor furniture, protecting your investment from moisture and sun degradation. While both aluminum and cedar can be used for the frame, louvered roof systems are almost exclusively made of aluminum. The material’s precision, light weight, and inability to warp or swell with moisture make it ideal for the interlocking mechanical components.
However, in Canada, a louvered roof’s most critical feature is its ability to handle snow. A flimsy system can be crushed by the weight of a heavy, wet snowfall. This is where resilience engineering comes in. You must ensure the system is rated for your region’s specific snow load, a factor that varies dramatically from coast to coast.
Your Action Plan: Verifying Snow Load Capacity for a Louvered Roof
- Identify Ground Snow Load (Ss): Find your location’s ground snow load (Ss) value in Table C-2 of the National Building Code of Canada (NBCC). These values range from 1.0 to 4.5 kN/m² across the country.
- Calculate Specified Snow Load (S): Use the NBCC formula S = Is[Ss(CbCwCsCa) + Sr] to determine the specific load your roof must withstand. This accounts for various factors.
- Apply Wind Exposure Factor (Cw): For roofs fully exposed to wind, which can blow snow away, this factor can often be reduced to 0.75, slightly lowering the required load rating.
- Verify System Rating: Cross-reference your calculated requirement with the manufacturer’s specifications. The louvered system’s certified snow load rating must meet or exceed your number.
- Check Drainage Design: Ensure the integrated drainage channels and downspouts are designed to handle the freeze-thaw cycles common in your Canadian region to prevent ice dams and damage.
How to secure a pergola to a patio without it flying away in a windstorm?
A beautifully designed pergola is worthless if it can’t withstand a Canadian windstorm or the slow, powerful force of frost heave. The structural integrity of your outdoor room begins below the ground. Simply bolting a pergola to an existing surface-level patio slab is a recipe for disaster. The secret to a permanent, stable structure lies in footings that extend deep below the regional frost line.
Frost heave is the process where water in the soil freezes, expands, and pushes the ground—and anything attached to it—upward. In the spring, the ground thaws and settles unevenly. This cycle can twist, lift, and destroy a poorly anchored structure in a single season. To prevent this, support posts must be anchored to concrete footings that reach a depth where the ground never freezes. For instance, Part 9 of the Ontario Building Code mandates a minimum footing depth of 1.2m (48 inches) in most of the province.
This is where the material choice has structural implications. Cedar posts can be set directly in concrete, but they are susceptible to rot over time at the ground-contact point. The superior method, used for both cedar and aluminum pergolas, involves pouring a concrete footing in a form tube (like a Sonotube) and setting a galvanized steel post bracket into the top of the wet concrete. The pergola post is then fastened to this bracket, keeping it elevated from ground moisture. This ensures longevity and allows for easier replacement if needed.
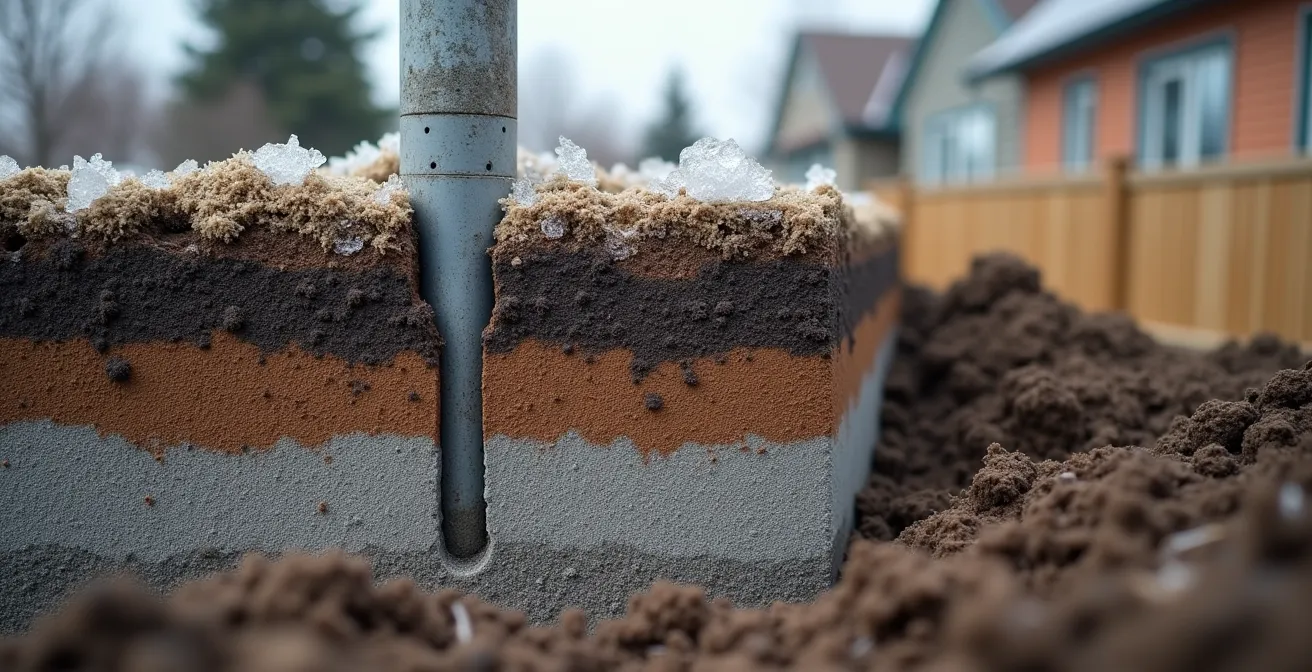
The visual above demonstrates this critical engineering. The footing acts as an anchor in the stable, unfrozen soil, ensuring your entire structure remains level and secure, regardless of the seasonal soil movement at the surface. Ignoring this step is not a viable cost-saving measure; it’s a guarantee of future failure.
Case Study: The Cost of Shallow Footings in Calgary
A Calgary homeowner was dismayed to find their new deck and pergola had become wavy and unlevel after just one winter. An investigation revealed the contractor had installed footings that did not reach the locally required 4-foot depth. The entire structure had to be supported while the old footings were removed and re-installed correctly using 8-inch Sonotubes extending well below the frost line to prevent future heaving. The repair costs far exceeded the initial savings of cutting corners.
Where to place your pergola to block summer sun but allow winter light?
Once you’ve engineered a resilient structure, the next design decision is its placement. The location of your pergola has a profound impact on both its usability and the comfort of your home. The primary goal is to achieve a delicate balance: blocking the high, intense sun of a Canadian summer while allowing the low, precious sun of winter to stream into your home, providing natural light and passive heat.
This is a question of solar orientation. In the Northern Hemisphere, the sun travels across the southern part of the sky. In summer, its path is high overhead, while in winter, it hangs low near the horizon. Therefore, the most effective placement for a pergola intended for climate control is typically against a south-facing wall of your house. In this position, the roof of the pergola—whether it’s fixed slats or an adjustable louvered system—can be angled to effectively block the high summer sun from hitting your windows and overheating your home.
Conversely, during the winter, the low sun can pass underneath the pergola’s roofline, entering your windows and warming the interior. This can reduce heating costs and combat the winter blues by maximizing natural light. Placement against an east- or west-facing wall is also an option, but it serves a different purpose. A pergola on the west side is excellent for blocking the intense, low-angle afternoon sun, making evenings on the patio more comfortable. A pergola on the east is ideal for shading a breakfast nook from the early morning glare.
Before finalizing the location, spend a day observing how the sun moves across your property. Note where the shadows fall at noon in the summer and at 3 PM in the winter. Imagine where you need shade for comfort and where you desire light for warmth. This simple act of observation is a fundamental step in designing an architectural extension that works in harmony with its environment.
The zoning mistake regarding “accessory structures” that forces you to tear it down
Perhaps the most heartbreaking mistake in any home improvement project is being forced to tear it down due to a legal oversight. Before a single post hole is dug, you must understand your local municipality’s rules regarding “accessory structures.” A pergola, in the eyes of the law, is not just backyard decor; it is a structure governed by zoning by-laws and building codes that dictate its size, location, and whether it requires a permit.
The most common tripwire is size. In many Canadian municipalities, structures over 10m² (108 sq ft) generally require a building permit. This isn’t a suggestion; it’s a legal requirement. Applying for a permit involves submitting plans for your pergola, which are reviewed by the city to ensure they comply with the building code for safety, including requirements for footings and structural load. Building without a permit can result in a “stop work” order, fines, or an order to dismantle the structure.
Another critical aspect of zoning is property setbacks. These are rules that define how far any structure must be from your property lines, from the street, and from your primary home. You cannot simply build a pergola right up to your fence line. Violating setback requirements is a common and costly error. Furthermore, by-laws may limit the total percentage of your lot that can be covered by accessory structures. If you already have a large shed and a pool house, your proposed pergola might exceed this limit.
The first step is always to visit your local municipality’s website or call the planning department. Do not rely on your contractor’s word or what a neighbour did years ago. Ask for the specific by-laws concerning “accessory buildings” or “accessory structures.” Understanding these rules is a non-negotiable part of the system engineering process. It ensures your investment is not only physically sound but also legally secure.
How to integrate slats or curtains to block the neighbor’s view?
In many Canadian suburban neighbourhoods, lots are getting narrower and houses are being built with larger windows. This creates a privacy paradox: we want expansive views from inside our homes, but we don’t want our neighbours having an expansive view into our backyards. A well-designed pergola is the perfect solution, acting as a framework to create an “outdoor room” with walls that provide privacy without inducing claustrophobia.
There are two primary strategies for creating these walls: hard screening and soft screening. Hard screening involves integrating fixed or adjustable panels into the sides of the pergola. Horizontal aluminum or cedar slats are a popular modern choice. They can be spaced to provide a semi-private screen that blocks direct sightlines while still allowing airflow and dappled light. For more control, fully adjustable louvered panels can be installed vertically, allowing you to open or close them as needed. This approach is particularly effective for blocking views from a specific direction, such as a neighbour’s second-story window.
Soft screening uses textiles or plants to create a more fluid and natural barrier. Outdoor-rated curtains made from weather-resistant fabric can be hung from tracks on the pergola’s frame. They offer a resort-like feel and can be drawn for full privacy or tied back to open up the space. For a greener approach, integrating a trellis system into one or more sides of the pergola allows you to grow climbing plants. Native Canadian species like Virginia Creeper or Climbing Honeysuckle can create a lush, living wall that provides excellent privacy during the summer months.

The choice between aluminum and cedar for these privacy elements often follows the main structure. Cedar slats offer a warm, natural texture, while aluminum provides a sleek, low-maintenance alternative that pairs perfectly with a modern aluminum frame. The most effective designs often combine elements, such as a fixed slatted wall on the most exposed side and soft curtains on another for flexibility.
Case Study: The “Exterior Privacy Layer” in a Toronto Suburb
Homeowners in a dense Toronto development installed an aluminum pergola with adjustable side louvers a few feet away from their floor-to-ceiling living room windows. This “exterior privacy layer” successfully obscured sightlines from close neighbours, allowing them to keep their interior blinds open and preserve their view. As an added benefit, it also reduced low-angle glare during spring and fall, making the interior space more comfortable.
How to maintain privacy in floor-to-ceiling window homes without ruining the view?
Homes with floor-to-ceiling windows present a unique design challenge: how to maintain a sense of privacy without sacrificing the very feature you love—the expansive view. The conventional solution of interior blinds or curtains feels like a compromise, shrouding the room in darkness and disconnecting it from the outdoors. The “exterior privacy layer” concept, often built around a pergola, is a far more elegant and effective architectural solution.
By placing a pergola a few feet out from the window wall, you create an intermediate zone. This structure becomes the framework for privacy, using the slatted screens, louvers, or climbing plants we’ve discussed. It blocks inward sightlines from neighbours at an angle, while preserving the direct, straight-ahead view from inside your home. You maintain a connection to your garden and the sky, without feeling like you’re on display.
This is an area where the debate between aluminum and cedar becomes highly relevant to the goal of preserving a view. A cedar pergola, with its thicker posts and beams (typically 6×6 or larger), can create a more substantial, rustic frame. While beautiful, its bulky elements can feel more obstructive to a clean, modern view. An aluminum pergola, on the other hand, benefits from the material’s superior strength-to-weight ratio. It allows for a much slimmer, more minimal frame profile while still meeting all structural and engineering requirements for wind and snow. This sleek design is less intrusive, maximizing the glass-to-view ratio and complementing the modern aesthetic of floor-to-ceiling windows.
This is why, for projects focused on creating a four-season, low-maintenance outdoor room, aluminum is often the superior choice for the Canadian climate. As the experts at Canadian Shade note:
Aluminum pergolas are ideal for Canadian climates due to their rust resistance, durability, and low maintenance. They’re designed to withstand snow, heavy rain, and strong UV rays.
– Canadian Shade, Custom Outdoor Retractable Pergola Guide
How to read a city’s “Official Plan” to know where density is legally mandated?
A truly forward-thinking outdoor designer considers not just the property as it is today, but what the neighbourhood might become in five, ten, or twenty years. Your perfect, private oasis could be ruined if a three-story condo building is approved for the lot next door. Future-proofing your privacy is an advanced design step, and it involves a bit of detective work in your municipality’s “Official Plan.”
The Official Plan is a legal document that lays out the long-term vision for development in your city or town. It dictates where future growth and density are not just allowed, but actively encouraged. By learning to read these plans, you can anticipate changes that could impact your property’s light, views, and privacy. For example, if your property backs onto a street designated as a future “Transit Corridor” or “Intensification Area,” you can expect to see larger, denser buildings constructed there over time. This knowledge might prompt you to invest in a more substantial privacy screen on that side of your pergola from the outset.
Conversely, if your home is in an area designated as a “Stable Residential Neighbourhood” with strict rules against lot-splitting and multi-unit dwellings, you can be more confident that your current level of privacy will be maintained. Reading the plan also reveals permissions for things like “Secondary Dwelling Units” (like basement apartments or laneway houses), which can increase the number of people living nearby. This is not about opposing development, but about making informed design decisions to ensure your outdoor living space remains a sanctuary for years to come.
Your Action Plan: Future-Proofing Your Outdoor Privacy
- Access the Official Plan: Go to your municipality’s website and search for “[Your City Name] Official Plan.” The documents are publicly available.
- Find Land Use Maps: Look for maps labeled “Land Use Designation” or “Zoning.” Find your property and see how it and the surrounding areas are colored or coded.
- Identify Growth Zones: Search the document for key terms like ‘Intensification Areas’, ‘Growth Centers’, or ‘Transit Corridors’. Check if your property is near any of these zones.
- Check for “Missing Middle” Density: Look for policies on ‘Secondary Dwelling Units’, ‘Laneway Suites’, or ‘As-of-Right’ permissions for duplexes/triplexes, which indicate gradual density increases.
- Review Development Allowances: Check the rules for ‘Minor Variances’ which allow developers to request exceptions to zoning rules, giving you a sense of potential changes.
- Consult the Timeline: The ‘Implementation’ section of the plan often provides a timeline for when development in certain areas is expected to occur.
Key Takeaways
- A pergola’s value in Canada is in its engineering (footings, snow load) not just its material.
- Adjustable louvered roofs provide “dynamic shelter,” making a space usable in sun and rain.
- Strategic placement against a south-facing wall maximizes winter light and blocks high summer sun.
- Always verify local permit requirements (over 10m²) and property setbacks before construction.
How to heat an outdoor covered patio to make it usable at -5°C?
The final element in achieving true four-season livability is heat. Adding a heating solution can transform your pergola from a three-season space into a year-round retreat, allowing you to enjoy a warm drink outdoors even when the temperature dips below freezing. However, heating an outdoor space effectively and safely requires careful planning.
Before considering heaters, you must confirm your pergola’s structure can support a winter environment. This goes back to engineering. A pergola in a snowy Canadian climate must be able to handle significant weight. For example, high-quality, Canadian-manufactured aluminum pergolas often boast a snow load capacity of 70 pounds per square foot when the louvers are closed. This strength is necessary to create a covered space that can be safely occupied and heated in winter conditions. A cedar structure can also be engineered for this, but will require much bulkier beams to achieve the same rating.
Once structural integrity is confirmed, you can choose a heating source. The most effective heaters for open-air spaces are electric infrared heaters. Unlike convection heaters that warm the air (which then blows away), infrared heaters warm objects and people directly, just like the sun. They are efficient, silent, and can be permanently mounted to the pergola’s frame. For safety and code compliance, any permanent heater must be CSA-certified and installed by a licensed electrician.
The following table breaks down the common heating options for a Canadian patio, giving you a clear comparison of their costs and ideal applications. As the data shows, while propane offers portability, electric and natural gas solutions provide more integrated and cost-effective performance for a permanent outdoor room.
| Heat Source | Initial Cost | Operating Cost/Hour | Best For | CSA Certification Required |
|---|---|---|---|---|
| Electric Infrared | $500-$2000 | $0.30-$0.60 (Ontario rates) | Targeted heating zones | Yes |
| Natural Gas | $800-$3000 | $0.40-$0.80 | Permanent installations | Yes |
| Propane Patio Heater | $300-$1500 | $2.00-$3.00 | Portable solutions | Yes |
Frequently Asked Questions About Pergolas in Canada
What is the difference between a pergola and a gazebo from a permit perspective?
Pergolas have an open roof structure (like slats or louvers) providing partial shade, while gazebos have a solid, fixed roof offering full protection. This distinction is important, as it can affect permit requirements and how the structure is classified in many Canadian municipalities.
Do I need a permit for a pergola in Canada?
In most Canadian cities, a permit is likely required if the pergola is attached to your house, or if it exceeds a certain footprint size (typically 10m² or 108 sq ft). It is crucial to check with your local municipal building department before you start any work.
What surfaces can pergolas be installed on?
Pergolas can be installed on grass, existing patios, and decks. However, the surface must be level and the installation must be properly anchored to footings that go below the frost line to prevent shifting and damage, regardless of the surface type. Surface preparation may be required to meet local building codes.
Ultimately, the choice between aluminum and cedar is less important than the commitment to a holistic design process. The superior “material” is the one that best serves the engineered system you’ve designed for your specific needs, climate, and lifestyle. However, when the goal is a resilient, low-maintenance, and architecturally sleek four-season outdoor room, a fully-engineered aluminum system consistently provides the stronger foundation for success in the demanding Canadian environment. Begin designing your own resilient outdoor space by assessing your property’s unique solar, privacy, and structural needs.