Seeing water pool near your foundation is a sign that your property’s defenses are overwhelmed, a problem that a single rain garden won’t solve.
- Effective stormwater management requires an integrated system of solutions, not just one isolated feature.
- Each component—from rain barrels to permeable surfaces—plays a specific role in capturing, slowing, or redirecting water to protect your home’s structure.
Recommendation: Start by auditing your property’s grading and downspout locations to identify the true source of the problem before investing in any single solution.
For many Canadian homeowners, a heavy downpour brings a familiar sense of dread. You watch the water sheeting off your roof, overwhelming the gutters, and forming ominous pools right next to your foundation. The common advice is often to “install a rain garden,” a seemingly simple and eco-friendly fix. While well-intentioned, this advice often misses the bigger picture. A single rain garden, installed without a broader strategy, is like putting a single patch on a leaky roof during a hurricane. It might help, but it doesn’t address the fundamental issue of water volume and flow.
The real challenge isn’t just about planting some water-loving perennials; it’s about hydrological engineering at a residential scale. As an urban hydrologist, I see homeowners make the same mistake: they focus on a single solution instead of designing a comprehensive Foundation Defense system. A truly resilient property manages water in layers, with a network of components working together. This system anticipates the journey of a raindrop from your roof to its final, safe destination, far from your basement walls. It accounts for the unique challenges of the Canadian climate, from intense summer thunderstorms to the massive volumes of water released during the spring thaw.
This guide moves beyond the simple “how-to” of building a rain garden. It provides a strategic framework for creating an integrated stormwater management system for your property. We will explore how different elements—from simple rain barrels to advanced green roofs—can be combined to capture, retain, and safely infiltrate water. The goal is to transform your yard from a passive victim of downpours into an active participant in your home’s protection, reducing your water bill and your anxiety in the process.
This article will guide you through the key components of a personal stormwater system, explaining their roles, benefits, and critical considerations for the Canadian context. Discover how to create a layered defense that protects your investment and enhances your property’s resilience.
Summary: A Homeowner’s Guide to Managing Stormwater in Canada
- Linking multiple rain barrels: a cheap solution for watering and retention
- How to dig a dry well to divert downspout water away from the house?
- Can your garage roof handle a green roof to absorb storm water?
- The reverse grading mistake that funnels water into your basement window wells
- Where to legally pump your sump water without icing up the sidewalk?
- The flood zone map update that could make your dream home uninsurable
- Interlocking permeable stones vs Stabilized gravel: which looks better and lasts longer?
- Why choosing native Canadian plants reduces your water bill and maintenance time?
Linking multiple rain barrels: a cheap solution for watering and retention
Your first line of defense in any stormwater system begins where the water concentrates first: your downspouts. Rain barrels are the simplest and most cost-effective way to implement Volume Management at the source. By capturing roof runoff, you immediately reduce the hydraulic load on your property’s drainage system and foundation. A single barrel can fill up surprisingly quickly in a typical Canadian storm, which is why linking multiple barrels in a series—a “daisy chain”—is a far more effective strategy. This creates a much larger retention reservoir, providing a substantial source of free, non-chlorinated water for your gardens throughout the dry summer months.
Many Canadian municipalities actively encourage this practice through financial incentives. For instance, Edmonton’s RainWise program offers rebates that can significantly offset the cost of setting up a multi-barrel system. Before you buy, check your local city’s website for similar programs. The key to a long-lasting system in Canada, however, is proper winterization. Failure to prepare for the freeze-thaw cycle can lead to cracked barrels and damaged spigots. This involves completely draining all barrels, disconnecting hoses, cleaning out debris to prevent mold, and storing them securely before the first hard frost, typically reconnecting them after the last frost in mid-May.
A properly installed and maintained rain barrel array does more than just save on your water bill. It is the first critical step in slowing down stormwater, allowing subsequent elements of your system, like a rain garden or dry well, to manage the overflow more effectively rather than being overwhelmed from the start.
How to dig a dry well to divert downspout water away from the house?
When rain barrels overflow or when you need to divert a large volume of water away from a problematic area, a dry well is your next strategic tool. A dry well is essentially an underground pit filled with gravel or a pre-cast structure that collects and slowly infiltrates stormwater into the subsoil. It is a powerful solution for managing downspout discharge that would otherwise saturate the ground near your foundation. Unlike a rain garden, which is a surface-level feature, a dry well works invisibly underground to handle significant water volumes, making it an excellent component of your Foundation Defense system.
The construction of a dry well is more involved than a rain garden and requires careful planning. Before any digging, it is a legal requirement in many provinces to contact services like Ontario One Call to locate underground utilities. Hydrologically, the most critical factors are location and size. The well must be a minimum of 3 metres (10 feet) away from your foundation to prevent unintentionally directing water back towards your basement. Furthermore, its size should be calculated based not just on rainfall, but on the peak volumes experienced during the spring snowmelt, a uniquely Canadian consideration. An undersized well will be quickly overwhelmed, rendering it ineffective when you need it most.
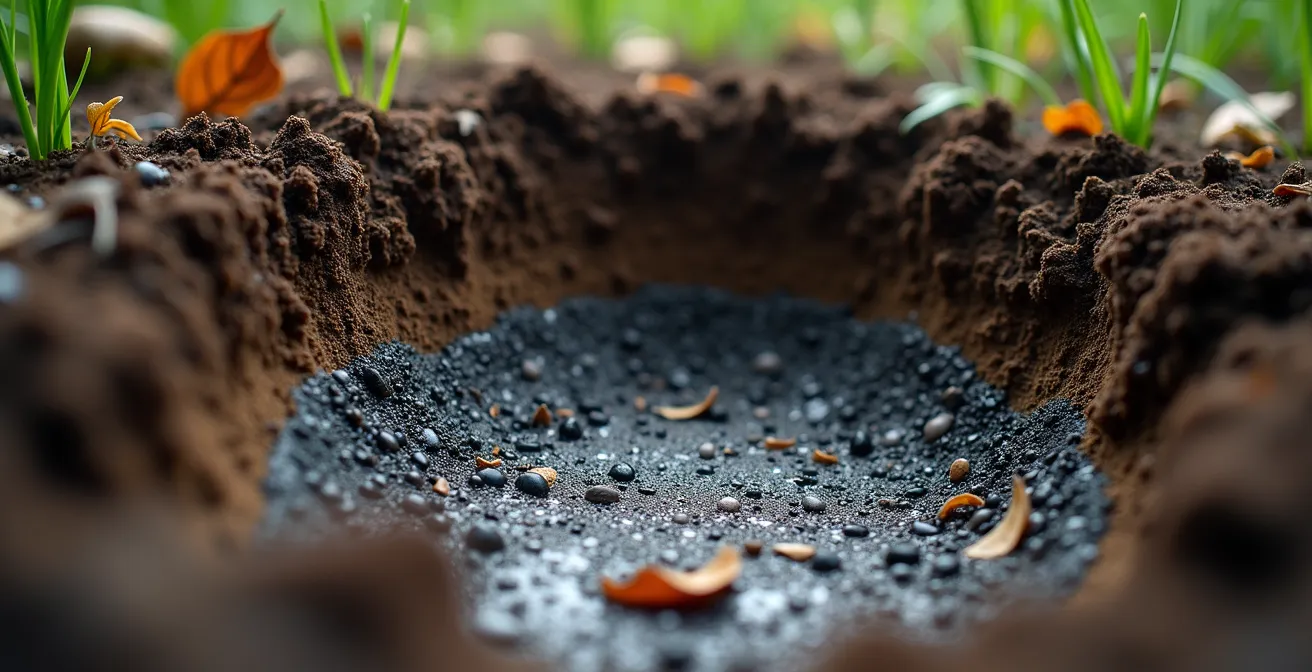
As this cross-section illustrates, a dry well functions by creating a large void space within a gravel matrix, allowing water to pool and gradually seep into the surrounding soil. A properly installed overflow path is also essential to manage extreme weather events, directing excess water to a safe location on your property. This engineered approach ensures that even heavy downpours are managed efficiently and kept far from your home’s vulnerable points.
Can your garage roof handle a green roof to absorb storm water?
A green roof, or “eco-roof,” represents a more advanced strategy for managing stormwater directly at the source. By covering a roof with a growing medium and vegetation, you create a living sponge that can absorb, filter, and slowly release rainwater, drastically reducing runoff volume. While often associated with large commercial buildings, a green roof can be a viable option for residential structures, particularly on a garage or shed with a low-slope roof. The critical question, however, is not one of gardening but of structural engineering: can the roof support the additional weight?
A green roof adds a significant “dead load” to the structure, especially when its soil is fully saturated with water. This weight, combined with the potential “live load” of snow in the winter, must be factored into your calculations. For Canadian homeowners, this means consulting a structural engineer is non-negotiable. Cities with established programs like Toronto’s Eco-Roof program, which provides significant funding, have strict technical standards for this reason. The investment can be substantial, but so are the benefits, including extended roof life, improved insulation, and a major reduction in stormwater runoff.
The following table, based on guidelines for buildings in high snow load regions, highlights the difference in structural requirements. It clearly shows that a green roof requires a structure designed to handle a much higher total load than a standard roof.
| Load Type | Standard Roof | Green Roof Addition | Total Load Required |
|---|---|---|---|
| Dead Load | 0.5 kPa | 1.0-2.0 kPa (saturated soil) | 1.5-2.5 kPa |
| Snow Load (2 kPa regions) | 2.0 kPa | Same requirement | 2.0 kPa |
| Combined Maximum | 2.5 kPa | N/A | 3.5-4.5 kPa |
This data from sources like structural design guidelines for high snow load regions underscores the need for professional assessment. While a green roof is a powerful tool for Climate Resilience, its implementation must be guided by safety and engineering first.
The reverse grading mistake that funnels water into your basement window wells
Before you invest in any complex stormwater solution, you must address the most fundamental—and often overlooked—flaw in residential water management: improper lot grading. If the ground around your home slopes towards the foundation instead of away from it, you have “reverse grading.” This single mistake actively channels every drop of rain and melting snow directly into your basement window wells and against your foundation walls, creating immense hydrostatic pressure. No rain garden or barrel system can effectively compensate for a landscape that is fundamentally working against your home.
Correcting the grade is the most critical aspect of your Foundation Defense. The goal is to establish a positive slope of at least 2-3% away from your foundation for a minimum distance of 10 feet. This means the ground should drop about 6 inches over that 10-foot span. This might not seem like much, but it’s enough to use gravity in your favor, directing surface water away from the house before it has a chance to pool or infiltrate near the foundation. The danger of reverse grading is amplified in the Canadian climate, as noted by leading conservation authorities.
Reverse grading is particularly dangerous during the Canadian spring thaw, when frozen ground prevents absorption and channels all surface melt directly towards the foundation.
– TRCA Water Management Guidelines, Toronto and Region Conservation Authority Building Guide
This expert insight highlights why what seems like a minor landscaping issue is actually a major structural risk during the most vulnerable time of year. Performing a simple grading audit with a string level and stakes can quickly reveal problem areas. Correcting the grade might involve adding clean fill topsoil and compacting it to create the necessary slope, a relatively low-cost fix that provides an enormous return on investment by preventing costly water damage.
Where to legally pump your sump water without icing up the sidewalk?
A sump pump is your last line of defense, a mechanical system that activates when water has already breached the perimeter and entered your basement’s weeping tile system or sump pit. While it’s a critical safety feature, its effectiveness depends entirely on where the collected water is discharged. Improper discharge is not only a nuisance but can also be illegal and dangerous, especially during Canadian winters. Pumping water onto your driveway or a sidewalk can create hazardous ice slicks, leading to potential liability and fines from your municipality.
The core principle of Regulatory Compliance dictates that sump water must be discharged in a way that doesn’t negatively impact public property or your neighbors. Connecting a sump pump to the sanitary sewer is strictly illegal in virtually all Canadian municipalities, as it overwhelms water treatment facilities. The correct approach is to discharge the water onto your own property, at a safe distance from your foundation (at least 3-6 metres) and in a location where it can be properly absorbed without causing issues. This is where your other stormwater system components come into play.
A well-designed system provides several legal and safe discharge options, even in winter:
- Dedicated Infiltration Swale or Rain Garden: Directing the discharge hose to a purpose-built bioswale or rain garden allows the water to be absorbed naturally.
- Seasonal Dry Well: In non-winter months, a dry well is an excellent destination for sump pump water.
- Pop-Up Emitters: These devices connect to an underground discharge line and pop up to release water when the pump is active, distributing it over a lawn area far from traffic.
- Heated Discharge Lines: In critical areas prone to freezing, a heated line can be an expensive but necessary solution to ensure the discharge path remains clear all winter.
By integrating your sump pump’s discharge into your overall stormwater management plan, you ensure it functions as a reliable emergency system without creating new hazards.
The flood zone map update that could make your dream home uninsurable
Managing water on your property is one part of the equation; understanding the large-scale risks associated with your property’s location is another. Federal and provincial governments are continually updating flood hazard maps using new climate data, which means a home that was once considered low-risk might now be located in a designated flood zone. This reclassification has profound and immediate consequences for homeowners and buyers, particularly concerning home insurance. When a property is flagged as being in a high-risk flood zone, the availability and cost of overland water coverage—insurance that protects against water entering your home from the overflow of a river or heavy rainfall—can change dramatically.
Insurers are increasingly using these maps to assess risk. As a result, properties in newly updated flood zones often face significant premium increases. Some insurers may even refuse to offer overland water coverage altogether unless the homeowner can provide proof of mitigation measures. This is where your personal stormwater management system becomes not just a tool for convenience, but a critical financial asset. Having documented proof of a rain garden, dry well, or proper grading can be a key negotiating point when seeking insurance. For prospective buyers, this makes flood map verification an absolutely essential part of due diligence before making an offer.
Failing to check these maps can lead to a devastating financial surprise, where your dream home becomes difficult or prohibitively expensive to insure against the most likely climate-related threat.
Your Action Plan: Due Diligence Checklist for Canadian Home Buyers
- Check federal Flood Hazard Identification and Mapping Program (FHIMP) maps for the property’s location.
- Review provincial conservation authority floodplain mapping for more detailed local data.
- Request the seller’s property information statement, which should disclose any history of past flooding incidents.
- Verify the property’s building permit history with the municipality to look for any flood-related retrofits or repairs.
- Obtain multiple insurance quotes specifically including overland water coverage *before* waiving conditions on an offer to purchase.
Interlocking permeable stones vs Stabilized gravel: which looks better and lasts longer?
Hard surfaces like driveways, walkways, and patios are often the biggest contributors to stormwater runoff on a residential property. Replacing traditional asphalt or concrete with a permeable surface is a highly effective strategy for managing water right where it falls. These surfaces allow water to pass through them and infiltrate into a specially prepared gravel base below, reducing runoff to nearly zero. For Canadian homeowners, the two most popular options are interlocking permeable pavers and stabilized gravel. The choice between them involves a trade-off between cost, aesthetics, and long-term maintenance in a demanding climate.
Interlocking permeable stones offer a polished, high-end look and are exceptionally durable. The gaps between the pavers are filled with clear crushed stone, allowing for high infiltration rates. They are generally plow-friendly and, with a proper base, perform well under repeated freeze-thaw cycles. However, they represent a significant upfront investment. Stabilized gravel, which uses a honeycomb-like grid to hold gravel in place, is a more budget-friendly option that provides a rustic, natural aesthetic. While effective at infiltration, it can be more susceptible to shifting from frost heave and requires more careful snow removal to avoid displacing the gravel.
This comparison table breaks down the key differences for homeowners navigating the Canadian climate.
| Feature | Interlocking Permeable Stones | Stabilized Gravel |
|---|---|---|
| Initial Cost | $15-25/sq ft | $8-12/sq ft |
| Freeze-Thaw Resistance | Good with proper base | Moderate, may shift |
| Snow Removal | Plow-friendly | Requires careful plowing |
| Maintenance (Annual) | Joint sand replacement | Regrading needed |
| Lifespan in Canada | 20-25 years | 10-15 years |
Ultimately, both options are vast improvements over impermeable surfaces. The decision depends on your budget, aesthetic preferences, and willingness to perform annual maintenance. Integrating permeable surfaces into your landscape is a major step towards achieving a fully resilient property that manages water proactively.
Key Takeaways
- A single solution is not enough; effective stormwater management relies on an integrated system of components.
- The primary goal of any system is Foundation Defense: actively directing water away from your home’s most vulnerable points.
- Understanding and correcting your property’s grading is the most critical and cost-effective action you can take.
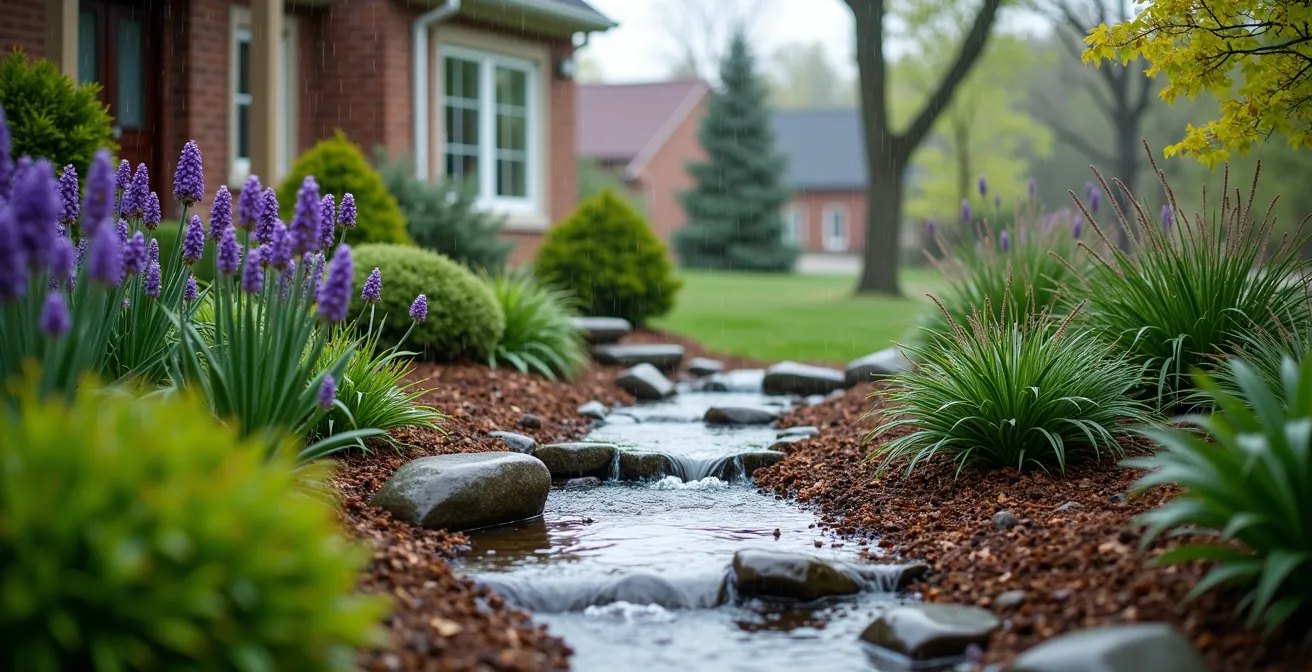
Why choosing native Canadian plants reduces your water bill and maintenance time?
The final, living layer of your stormwater management system is the vegetation. While the engineering components—the grading, pipes, and gravel—do the heavy lifting of directing water, it’s the plants that perfect the process. Choosing plants native to your specific Canadian ecoregion is the key to creating a rain garden or bioswale that is not only beautiful but also highly functional and low-maintenance. Native plants have deep, fibrous root systems that are exceptionally good at soaking up water and breaking up compacted soil, which dramatically increases infiltration. In fact, studies show that rain gardens with native plants achieve 30% more water absorption than a conventional lawn.
Once established, these plants are adapted to local precipitation patterns and require little to no supplemental watering, reducing your water bill. They are also naturally resistant to local pests and diseases, eliminating the need for pesticides and fertilizers. A common myth is that rain gardens become breeding grounds for mosquitoes. However, a well-designed garden with the right native plants and soil mix will absorb all standing water within 24-48 hours—faster than the mosquito life cycle. To ensure success, select plants specifically suited to your region’s unique climate:
- Pacific Maritime: Sword fern, Red osier dogwood, Pacific ninebark
- Prairie: Big bluestem grass, Prairie dropseed, Purple prairie clover
- Great Lakes-St. Lawrence: Joe Pye weed, Blue flag iris, Swamp milkweed
- Atlantic: Sweet gale, Blue vervain, Canada anemone
- Boreal: Labrador tea, Bunchberry, Mountain ash
By making native plants the “workforce” of your rain garden, you create a self-sustaining ecosystem that maximizes water absorption while minimizing your own workload. They are the essential final touch that transforms a simple drainage feature into a thriving, resilient landscape feature.
Now that you understand the components of a complete stormwater system, the next logical step is to assess your own property. Begin by walking your landscape during the next rainstorm to map how water flows, identify where it pools, and determine the root causes of your drainage challenges. This initial audit is the first step toward designing a system that will protect your home for years to come.