The secret to year-round curb appeal in Canada isn’t adding a few winter plants; it’s adopting a ‘Winter-First’ design philosophy that architects the landscape for resilience and beauty in the harshest months.
- Prioritize the ‘bones’ of your garden—hardscaping, structural plants, and topography—to create a strong silhouette against the snow.
- Select plants not just for summer blooms, but for their winter texture, colour, and ability to withstand snow and ice loads.
- Design functional systems for managing snow, salt, and water that protect your investment and reduce spring maintenance.
Recommendation: Shift your focus from designing for a fleeting July peak to creating a resilient, four-season system that finds its foundation in the stark beauty of February.
For many Canadian homeowners, the garden is a source of vibrant pride in July, only to become a five-month expanse of grey dormancy by February. We pour our energy into summer blooms and lush foliage, accepting that a bleak, uninspired landscape is the price we pay for our climate. The common advice is to sprinkle in a few evergreens or leave some dead seed heads standing, but these are merely footnotes to a garden designed with a summer-first mentality.
This approach is fundamentally flawed. It treats winter as a problem to be endured rather than an opportunity for a different kind of beauty. What if the key to a spectacular four-season garden wasn’t about retrofitting a summer design for winter, but the other way around? What if we designed for the stark, minimalist canvas of February first? This is the core of a ‘Winter-First’ design philosophy: creating a landscape with such strong structural integrity, calculated resilience, and a subtle winter palette that it looks intentional and beautiful in the depths of winter. A garden that accomplishes this will, by its very nature, be more robust, healthy, and stunning come July.
This guide will walk you through the essential principles of this resilient approach. We will explore how to build a landscape from the ground up—from the hardscaping base to the plant selection—that is architected to embrace the challenges of a Canadian winter. By focusing on structure, material science, and strategic planting, you can create a yard that offers genuine, year-round curb appeal.
To help you navigate these principles, this article is structured to build your ‘Winter-First’ design knowledge, from adding colour against the snow to making resilient choices that save you time and money. Explore the sections below to master each element of a truly Canadian landscape.
Summary: How to Design a Landscape That Looks Good in February, Not Just July?
- Red twigs and ornamental grasses: adding color against the white snow
- How to wrap cedars and boxwoods to prevent winter burn without looking ugly?
- Why your patio stones are uneven in spring and how deep the base should be?
- How to design driveways and walkways to minimize salt exposure to plants?
- Where to pile the snow: designing “snow dump” areas that don’t crush your garden
- How to landscape your yard to avoid attracting bears and cougars?
- Why you can never use sand on a permeable driveway in winter
- Why choosing native Canadian plants reduces your water bill and maintenance time?
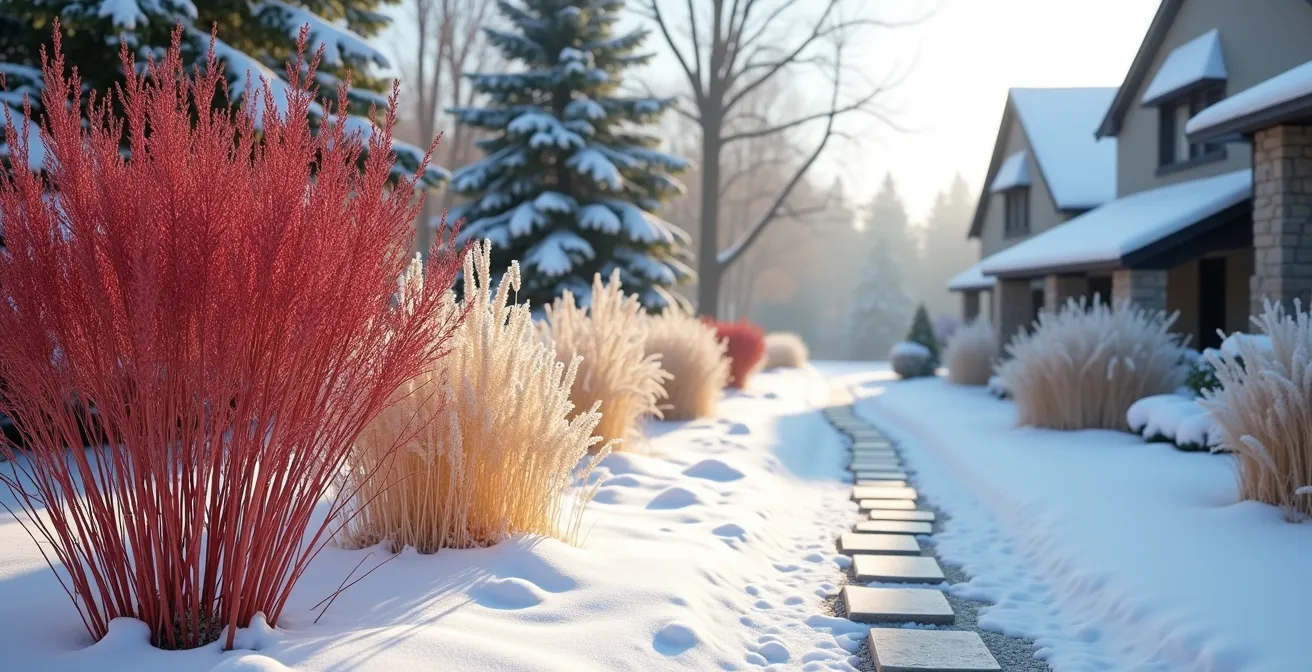
Red twigs and ornamental grasses: adding color against the white snow
The winter landscape is not a black-and-white photo; it’s a subtle, textured painting. The key is to create a ‘Fourth-Season Palette’ that uses form and colour to stand out against the snow. While evergreens provide a green backbone, the real artistry comes from plants that offer vibrant colour and structural form. Red Osier Dogwood (Cornus sericea) and its cultivars are iconic, with brilliant red stems that look like flames against a snowdrift. Similarly, the ghostly white bark of Paper Birch (Betula papyrifera) provides a strong vertical contrast, especially when planted in groves.
Ornamental grasses are another critical element, but selection is everything. Many popular grasses collapse under heavy Canadian snow, creating a messy eyesore. The goal is to choose grasses with strong structural integrity. ‘Karl Foerster’ Feather Reed Grass (Calamagrostis x acutiflora) is a champion in this regard, its upright form often remaining intact through winter. For visual impact, planting in masses is crucial. A single dogwood is a pleasant detail; a drift of five becomes a bold artistic statement. Consider the sun’s low winter angle, placing these colourful stems and golden grasses where the morning or afternoon light can backlight them, making them glow.
To implement this palette effectively, choose plants suited for your specific climate zone. The following list provides a starting point for creating powerful winter interest across different Canadian regions:
- Zone 3: Choose Arctic Fire® Dogwood (Cornus sericea ‘Farrow’) for brilliant red stems that are exceptionally hardy to -40°C.
- Zone 4: Add ‘Karl Foerster’ grass (Calamagrostis x acutiflora), which maintains its upright structure even through heavy snow loads.
- Zone 5: Include native Witch Hazel (Hamamelis virginiana) for its unique, fragrant yellow blooms that can appear in late winter.
- Zone 6-7: Consider Paper Birch (Betula papyrifera) for the stunning white bark that provides stark contrast against dark evergreens.
- For all zones: Mass plants in groups of 3 to 5 for significant visual impact against the white canvas of snow.
How to wrap cedars and boxwoods to prevent winter burn without looking ugly?
Protecting vulnerable evergreens like cedars and boxwoods from winter is a necessity, but the result is often a yard full of shapeless, burlap-shrouded lumps. The key to avoiding this is to treat winter protection as an act of design, not just a chore. The main culprit of damage is not the cold itself, but winter burn—desiccation caused by a combination of winter sun and wind drying out foliage when the frozen ground prevents roots from absorbing water. Aesthetically pleasing protection, therefore, focuses on creating breathable screens and structural supports rather than suffocating wraps.
Instead of tightly wrapping burlap around the plant, which can trap moisture and cause damage, construct simple A-frame shelters or drive stakes to create a screen on the south and west sides—the directions of the most intense winter sun and prevailing winds. This blocks the damaging elements while allowing crucial air circulation. For a more refined look, use natural-coloured twine or fishing line to create a decorative spiral or diamond pattern with the burlap, turning a functional object into a sculptural element.
This image demonstrates how protective elements can become an elegant part of the winter garden’s design.

As you can see, the combination of a decorative burlap wrap and a sturdy wooden frame protects the foliage without sacrificing aesthetics. This approach is exemplified by a case study in Saskatchewan, where a notoriously harsh winter climate demands smart solutions. Local gardeners found that the hardy ‘Brandon’ cedar cultivar performed much better than the common Emerald Green. Moreover, they achieved success by using burlap screens only on the sun and wind-exposed sides, proving that less-is-more protection can be more effective and visually appealing.
Why your patio stones are uneven in spring and how deep the base should be?
The quintessential sign of spring for many Canadian homeowners is a lumpy, uneven patio. This isn’t a sign of poor craftsmanship on the surface; it’s a failure of the foundation below. The culprit is a phenomenon called frost heave. Water in the soil expands by about 9% when it freezes, exerting immense upward pressure that can lift pavers, fence posts, and even foundations. When the ground thaws, it subsides unevenly, leaving your once-perfect patio a tripping hazard. A ‘Winter-First’ design addresses this from the very beginning by creating a base that is too deep and well-drained for frost to take hold.
The solution is a properly excavated and prepared base that extends below the regional frost line. The depth of this base is non-negotiable and varies significantly across Canada, from the milder coast of British Columbia to the deep-freezing prairies. The base material, typically a ¾” clear angular stone, creates a stable foundation with large pore spaces. This allows any water that penetrates the base to drain away quickly, preventing it from freezing and heaving. A geotextile fabric is used to separate the stone base from the subsoil, preventing them from mixing and compromising the drainage. Investing in a proper base is a one-time cost that prevents years of frustration and repairs. In fact, professional contractors in Nova Scotia report that a proper installation costs $2,500-$3,500 once, whereas re-leveling a poorly built patio can cost $800-$1,200 every few years.
The following table outlines the minimum recommended base depths for a paver patio in different Canadian regions to prevent frost heave.
| Canadian Region | Frost Line Depth | Recommended Base Depth | Material Specification |
|---|---|---|---|
| Southern Ontario | 1.2m (4ft) | 30cm (12″) | ¾” clear angular stone + geotextile |
| Quebec/Atlantic | 1.5m (5ft) | 38cm (15″) | ¾” minus with 4-6″ lifts |
| Prairie Provinces | 2.1m (7ft) | 45cm (18″) | Type 3 MOT (no fines) + drainage |
| British Columbia Coast | 0.6m (2ft) | 20cm (8″) | Class 5 crusher run |
How to design driveways and walkways to minimize salt exposure to plants?
De-icing salt is a winter reality, but it’s a silent killer for gardens. Sodium chloride runoff creates toxic soil conditions, dehydrates plant roots, and causes leaf burn on even the most robust species. A resilient landscape is designed to manage this salty reality proactively. The strategy is twofold: physically directing the salty water away from plants and selecting species that can tolerate higher salt concentrations in unavoidable splash zones. It’s about creating a system of calculated resilience rather than hoping for the best.
Simple design choices can make a huge difference. Installing a 15-20cm raised curb along a driveway or walkway acts as a physical barrier, deflecting salt spray and runoff from adjacent garden beds. Another highly effective technique is creating a ‘sacrificial’ drainage trench, a 30cm-wide channel filled with river rock between the hard surface and the garden. This trench captures the majority of the salty meltwater and allows it to drain away from plant roots. Furthermore, grading all surfaces with a gentle 2% slope away from sensitive plantings is a fundamental and critical step.
Plant selection is the final layer of defence. The area immediately bordering a road or driveway is the most hostile environment. A successful strategy, proven by municipalities in Ontario, is a tiered approach. The first meter from the road’s edge, which receives the heaviest salt contamination from plows, should be planted with hyper-tolerant groundcovers. The next zone can host medium-tolerance perennials, while sensitive species are reserved for areas well away from the salt spray. This design has been shown to dramatically reduce plant mortality, proving that smart design can create thriving gardens even in the toughest spots.
- Install raised curbs (15-20cm high) along driveways to deflect salt spray.
- Create ‘sacrificial’ river rock trenches (30cm wide) to capture salty runoff.
- Plant highly salt-tolerant natives like Serviceberry (Amelanchier canadensis), Norway Spruce (Picea abies), and Honeylocust (Gleditsia triacanthos) in vulnerable areas.
- For boulevard strips, use exceptionally tough plants like Rugosa Roses, Gray Dogwood, or Siberian Peashrub (Caragana arborescens).
- Grade all surfaces at a 2% slope away from sensitive plantings.
Where to pile the snow: designing “snow dump” areas that don’t crush your garden
In Canada, snow isn’t just a weather event; it’s a logistical challenge. Every driveway, walkway, and patio that you clear generates a significant volume of snow that has to go somewhere. Too often, the ‘somewhere’ is on top of delicate shrubs or perennial beds, resulting in crushed branches, compacted soil, and suffocated plants come spring. A ‘Winter-First’ design anticipates this volume and creates designated, reinforced “snow dump” zones as a functional part of the landscape.
The ideal snow dump area is a space that is either unplanted (like a section of lawn that can handle compaction) or planted with exceptionally tough, resilient species that can bounce back from being buried. Think flexible, low-growing shrubs like native junipers or tough groundcovers that go dormant. Avoid piling snow on top of brittle plants like roses or broadleaf evergreens like rhododendrons, as the weight will snap their branches. It’s also critical to consider where the snow will melt. A massive pile of snow becomes a massive source of water in spring; ensure the area has good drainage and is graded away from your home’s foundation and sensitive garden beds to prevent waterlogging.
Furthermore, be aware of municipal regulations. Many Canadian cities have bylaws governing snow storage on private property to ensure public safety and proper drainage. For instance, some bylaws prohibit piling snow higher than 1.5 meters or within 3 meters of a property line to maintain sightlines for drivers and pedestrians. By planning for snow from the outset, you transform a winter chore into a seamless part of your landscape’s function, protecting your plants and preventing a mountain of problems in the spring.
How to landscape your yard to avoid attracting bears and cougars?
For many Canadians living near wild spaces, a resilient landscape isn’t just about surviving winter; it’s about coexisting safely with wildlife. Bears, cougars, and other animals are a part of the ecosystem, and a poorly designed yard can inadvertently act as an invitation for dangerous encounters. ‘Bear Smart’ or ‘Wild-Safe’ landscaping is a critical component of a ‘Winter-First’ design philosophy, as it focuses on creating a defensible and unattractive space for predators, particularly in the fall when they are actively seeking food before hibernation.
The primary principle is to eliminate sources of food and shelter. This means removing attractants like fruit-bearing trees (crabapples, cherries) and unsecured compost bins. A Calgary homeowner successfully deterred frequent bear visitors by replacing their crabapple trees with non-fruiting structural grasses and aromatic herbs like lavender, which bears dislike. The second principle is maintaining clear sightlines. Dense vegetation near the house provides cover for predators like cougars. Creating a 10-meter clear zone around your home and trimming tree canopies up to 2.5 meters high eliminates ambush points and gives you a clear view of your surroundings.
A defensive landscape uses thorny, unpalatable plants as natural barriers. Planting dense thickets of hawthorn, wild rose, or gooseberry along property lines or in strategic locations can create a formidable, yet beautiful, deterrent. By designing with wildlife in mind, you are not only protecting your family and property but also protecting the animals by preventing the conflicts that often lead to their destruction.
Your Action Plan: Bear & Cougar-Resistant Landscape Audit
- Clear Zones: Establish and maintain a 10-meter clear zone with no dense vegetation around all buildings to eliminate hiding spots for predators.
- Defensive Planting: Inventory your plants. Remove fruit-bearing ornamental trees and shrubs within 30 meters of structures. Replace them with thorny, bear-resistant species like Hawthorn or Wild Rose to create defensive barriers.
- Eliminate Ambush Points: Inspect all trees on your property. Trim canopies so the lowest branches are at least 2.5 meters from the ground, removing potential perches or ambush points for cougars.
- Secure and Illuminate: Audit all pathways and building perimeters. Install motion-sensor lighting to eliminate dark corridors. Ensure all composters are bear-proof and garbage is stored securely until collection day.
- Pre-Hibernation Sweep: Perform a thorough property audit every October. Remove all bird feeders, harvest all remaining fruit from any trees, and double-check that all potential food sources are secured.
Why you can never use sand on a permeable driveway in winter
Permeable paver systems are a fantastic, eco-friendly solution for managing stormwater, but they come with one absolute, unbreakable rule for Canadian winters: never use sand for traction. A permeable driveway works because the joints between the pavers are filled with a small, clean aggregate (chip stone) that allows water to pass through into the reservoir base below. When you spread sand on the surface for ice control, the fine particles are washed directly into these joints with the first melt.
This process systematically clogs the system. The sand fills the pore spaces between the aggregate, turning your expensive, functional permeable surface into a non-permeable one. Water begins to pool on the surface, defeating the entire purpose of the installation. Worse, this trapped, sand-filled water can freeze, causing frost heave and potentially dislodging the pavers. The only remedy for a sand-clogged system is a costly and intensive professional power-washing to try and blast the sediment out of the joints. In fact, industry data shows that this professional restoration can cost $3,000-$5,000, a significant expense to fix a completely avoidable problem.
Fortunately, there are several effective, permeable-safe alternatives for winter traction. The key is to use materials with a particle size large enough that they won’t clog the joints. Sharp, washed grit or very small chip stone provides excellent mechanical grip without compromising the system’s function. The following table compares common winter traction aids and their suitability for permeable surfaces.
| Product Type | Particle Size | Clogging Risk | Effectiveness | Cost/ton |
|---|---|---|---|---|
| Sharp washed grit | 6-8mm | None | -15°C to 0°C | $85 |
| Coarse de-icing crystals | 4-6mm | None (dissolves) | -25°C to 0°C | $120 |
| Regular sand | 0.5-2mm | Extreme – clogs joints | -5°C to 0°C | $40 |
| Crushed lava rock | 5-10mm | None | -10°C to 0°C | $95 |
Key Takeaways
- A ‘Winter-First’ design philosophy prioritizes structure, colour, and function for the harshest months, creating a more resilient and beautiful year-round garden.
- Preventing winter damage involves both aesthetic protection (like decorative burlap screens) and robust engineering (like deep patio bases to counter frost heave).
- Managing winter’s challenges like salt and snow requires proactive design, including raised curbs, designated snow dump zones, and wildlife-aware planting.
Why choosing native Canadian plants reduces your water bill and maintenance time?
The ultimate expression of a ‘Winter-First’, resilient landscape is the widespread use of native plants. These are the species that have evolved over millennia to thrive in your specific local climate—its soil, its rainfall patterns, and its temperature extremes. By choosing plants that are already perfectly adapted to your location, you are creating a self-sufficient ecosystem rather than a high-maintenance garden. This is the foundation of a truly sustainable and low-effort landscape.
Non-native ornamental plants often require constant intervention: supplemental watering, fertilization, and pest control to survive in a foreign environment. Native plants, once established, are largely self-sufficient. Their deep root systems are adept at finding groundwater, dramatically reducing the need for irrigation. In fact, research from Canadian gardening studies indicates native plant gardens require 75% less supplemental watering after their second year compared to traditional ornamental gardens. This translates directly to lower water bills and less time spent dragging a hose around.
A compelling case study from a Mississauga subdivision shows this principle in action. A new homeowner used a “Native for New Build” approach, starting with fast-growing groundcovers, adding structural shrubs in the second year, and feature trees in the third. The result is a mature landscape that requires zero irrigation beyond natural rainfall and has significantly boosted the property’s value. From the Boreal Shield to the Carolinian Zone, there is a palette of beautiful, hardy native plants ready to build the backbone of your resilient garden.
- Carolinian Zone (Southern Ontario): Plant Butterfly Weed (Asclepias tuberosa) and Wild Columbine (Aquilegia canadensis).
- Boreal Shield: Choose Saskatoon Berry (Amelanchier alnifolia), Paper Birch (Betula papyrifera), and Canada Anemone (Anemone canadensis).
- Prairie Grasslands: Select June Grass (Koeleria macrantha), Little Bluestem (Schizachyrium scoparium), and Prairie Smoke (Geum triflorum).
- Atlantic Maritime: Use Bayberry (Morella pensylvanica), Beach Pea (Lathyrus japonicus), and Rosa rugosa.
By shifting your perspective to a ‘Winter-First’ philosophy, you move beyond the cycle of seasonal boom and bust. You create a living system with a strong, beautiful structure that not only endures the Canadian winter but celebrates it. To begin applying these strategies, the next logical step is to assess your own property’s weaknesses and opportunities through the lens of four-season resilience.