The real threat to your roof isn’t the depth of the snow, but its weight, composition, and where it’s located.
- Wet, heavy spring snow can be over three times heavier than dry, fluffy powder, creating extreme stress.
- Clearing only one side of a roof can create a dangerous, unbalanced load that trusses are not designed to handle.
Recommendation: Learn to read your home’s structural warning signs and use safe, ground-based removal techniques to proactively prevent a catastrophic failure.
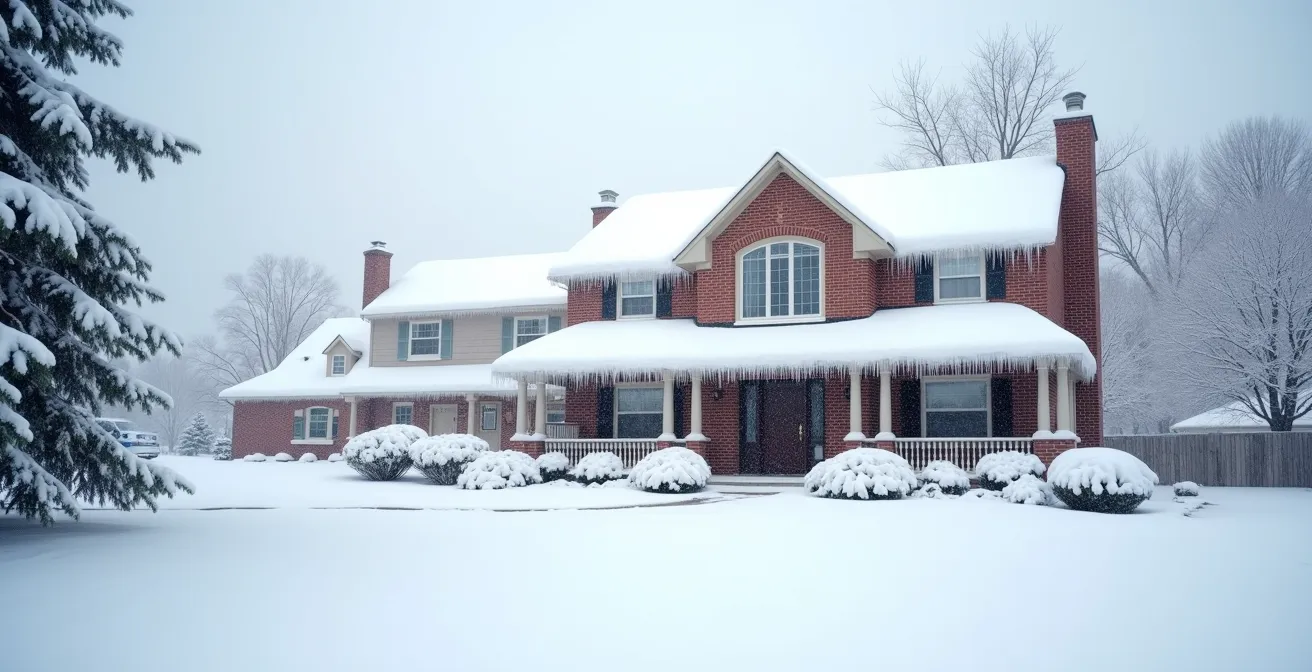
For any Canadian cottage or rural homeowner, the sound of creaking timbers under a heavy winter blanket of snow is a source of deep anxiety. It’s a sound that brings a single, urgent question to mind: is the roof going to hold? The common response is often a reactive one—climbing a treacherous, icy ladder to shovel off the weight. But this approach is both dangerous and often misinformed.
The standard advice often overlooks the fundamental physics at play. Calculating snow load isn’t a simple matter of measuring depth. The true risk lies in understanding the complex, dynamic forces acting on your structure. It’s about knowing the difference between the feathery powder of an Alberta Clipper and the water-logged cement of a “Pineapple Express” storm. It involves recognizing the immense torsional stress created by unbalanced loads and identifying the subtle clues your house gives you long before a disaster occurs.
This guide moves beyond simple calculations. Instead, it provides a structural engineer’s perspective on risk assessment. We will not just tell you *what* to look for, but explain *why* these factors are critical. By understanding the principles of snow density, load distribution, and structural behavior, you can shift from winter anxiety to an informed, actionable safety plan for your property. This is your guide to reading the risks and protecting your home’s structural integrity.
To help you navigate these critical safety considerations, this article is structured to address the most pressing questions a homeowner faces. The following sections break down the science behind snow loads, safe removal practices, and the warning signs that demand immediate attention.
Summary: A Homeowner’s Guide to Assessing and Managing Roof Snow Load
- Why 2 feet of wet spring snow is more dangerous than 4 feet of dry powder
- How to remove snow from your roof without damaging the shingles or falling off?
- Visual cues that your roof trusses are under stress before they fail
- Why clearing only one side of the roof can cause immediate collapse?
- What is the minimum roof pitch required for snow to slide off naturally?
- The snow removal clause that could leave you stranded for 3 days in January
- Do you really need snow guards to protect your gutters and pedestrians?
- Why are massive icicles on your eaves a symptom of heat loss, not just weather?
Why 2 feet of wet spring snow is more dangerous than 4 feet of dry powder
The single greatest misconception about snow load is that depth equals danger. From a structural standpoint, the critical factor is density, or weight per volume. Not all snow is created equal. The light, fluffy powder that falls in the deep cold of mid-winter is mostly air. In contrast, the wet, heavy snow of a late winter or early spring storm is saturated with water, making it exponentially heavier and more dangerous.
The numbers are stark. According to snow density research, wet snow can weigh up to 20 pounds per cubic foot, whereas dry powder might weigh as little as 7 pounds per cubic foot. This means that just two feet of wet, slushy snow can exert more force on your roof than four feet of dry, cold-weather powder. This effect is compounded when rain falls on existing snow, rapidly increasing its weight and turning your roof into a saturated sponge.
Understanding the type of snow your region typically receives is crucial for risk assessment. The following table illustrates how different Canadian weather patterns produce snow with dramatically different densities and, therefore, different levels of structural risk.
| Snow Type | Density (lb/ft³) | Typical Canadian Weather Pattern |
|---|---|---|
| Fresh Dry Powder (Alberta Clipper) | 4-7 | Cold, dry conditions (-15°C to -25°C) |
| Settled Snow | 15-20 | After 2-3 days of temperature variation |
| Wet Spring Snow (Pineapple Express) | 25-52 | Near-freezing temperatures with high moisture |
| Ice from Freeze-Thaw | 52-58 | Southern Ontario/Quebec cycles |
As the table shows, a late-season storm in the Maritimes or a freeze-thaw cycle in Southern Ontario can produce loads that are an order of magnitude greater than a mid-winter snowfall on the Prairies. This is why a “moderate” 30 cm spring snowfall can pose a far greater threat of collapse than a 60 cm blizzard in January. Monitoring the weather isn’t just about accumulation; it’s about anticipating these changes in snow water equivalent (SWE) and understanding the dynamic forces being applied to your structure.
How to remove snow from your roof without damaging the shingles or falling off?
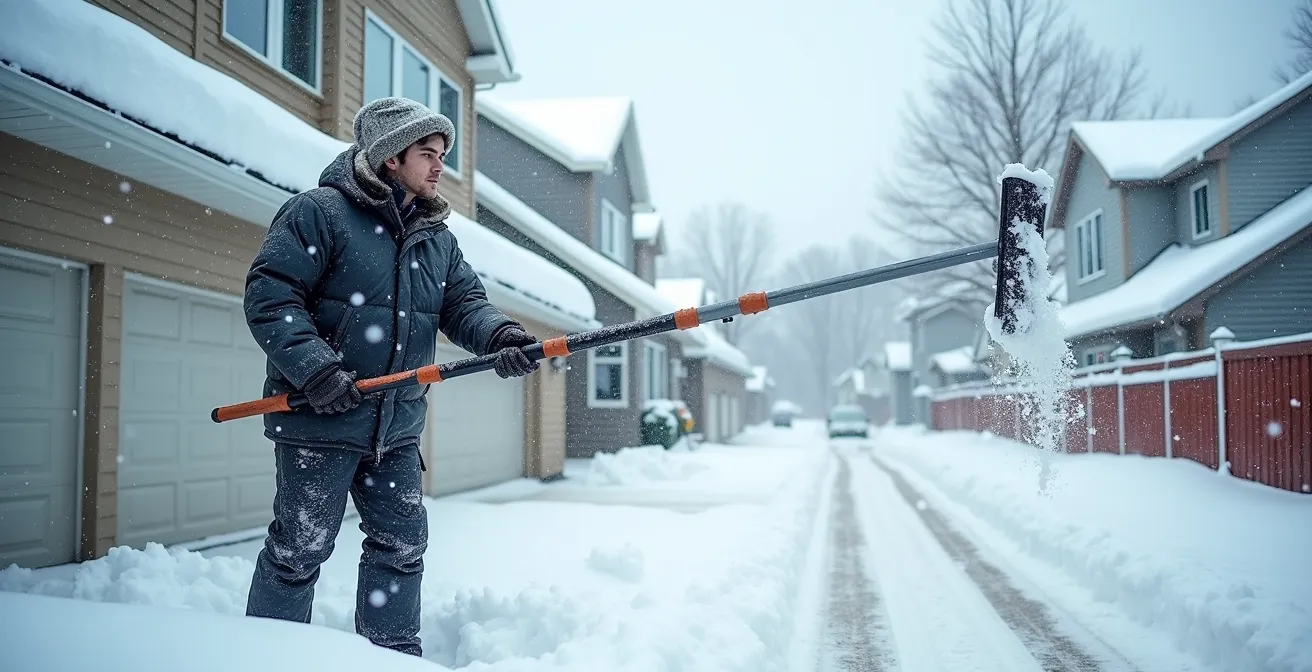
When the snow load becomes a concern, the immediate impulse is to get it off. However, improper removal can be as dangerous as the snow itself, both to you and your roof. The absolute first principle of snow removal is to stay off the roof. Climbing onto a slippery, snow-covered surface, especially on an older or stressed structure, is a recipe for a life-altering fall. All removal should be done from the safety of the ground.
The correct tool for this job is a telescopic snow rake. These long-handled rakes allow you to stand safely on a cleared driveway or patio and pull snow down from the eaves. This method is not only safer for you but also protects your roofing material. Using metal shovels or sharp tools can gouge, crack, or tear asphalt shingles, creating pathways for future leaks. As Montreal home inspector Ian Towers warns, this is a common and costly mistake.
As he noted in an interview with the CBC, homeowners must be extremely careful with their tools and methods. In his words:
People who scrape their roofs with a shovel can damage the shingles and the roof covering themselves and cause leaks or rip the shingles off.
– Ian Towers, Montreal home inspector interview with CBC
When using a snow rake, never try to clear the entire roof down to the shingles. Leave a base layer of 5-10 cm (2-4 inches) of snow. This provides a protective buffer that prevents the rake head from abrading the shingle granules or catching on flashing. The goal is to remove the bulk of the weight, not to achieve a perfectly clean surface. Focus on removing enough snow to alleviate the immediate stress on the structure.
Visual cues that your roof trusses are under stress before they fail
A roof rarely fails without warning. A structure under extreme stress will almost always send out distress signals. The key is knowing how to listen and what to look for. These signs often manifest inside the house, as the load from the roof transfers down through the load-bearing walls and impacts the entire frame of the building. Your doors and windows are excellent barometers of structural stress.
If interior doors that previously opened and closed smoothly suddenly begin to stick, jam, or won’t latch, it’s a significant red flag. This indicates that the door frames are being distorted by the weight above. Similarly, watch for new, visible cracks appearing in the drywall, especially diagonal cracks extending from the corners of door and window frames. While minor hairline cracks can be normal, new or growing cracks under a heavy snow load are a direct symptom of structural strain.
Case Study: Proactive Measures in Quebec’s 2019 Winter Storms
The importance of early detection was highlighted during a series of roof collapses across Quebec in February 2019. In response, officials at the Jules-Émond school in Val-Bélair took decisive action. After inspectors identified early warning signs of excessive stress on the structure, the school was closed for preventive snow removal, likely averting a disaster. This event prompted Quebec’s municipal affairs minister to remind all building owners that they are legally responsible for monitoring these warning signs, underscoring that proactive observation is a critical part of property maintenance.
Beyond visual cues, listen to your house. Unusual creaking, groaning, or popping sounds from the ceiling or walls that are out of the ordinary for a winter day can indicate that structural members are shifting or straining. A sudden loud bang or crack is a sign of immediate failure and is a signal to evacuate the building immediately. To help you categorize these signs, you can use a simple triage system.
Your Canadian Home Triage Checklist: Roof Stress Signs
- GREEN (Monitor): Normal winter house sounds (minor creaks), minor door sticking that has always been present in humid weather. No new cracks are visible.
- YELLOW (Watch Closely & Prepare to Act): New cracks appearing above doorframes. Windows or interior doors becoming noticeably harder to close. Unusual creaking or groaning sounds during wind gusts or temperature changes.
- RED (Evacuate Immediately & Call a Professional): A loud bang, crack, or popping sound from the ceiling or walls. A visible sag in the roofline when viewed from outside. Sudden, large diagonal cracks in walls. Doors that suddenly will not close at all.
Why clearing only one side of the roof can cause immediate collapse?
In an effort to reduce snow load, many homeowners make a critical and counterintuitive mistake: they clear only one side of the roof. This action, intended to relieve stress, can actually trigger an immediate structural failure. Roof trusses, particularly on standard gable roofs, are designed as a balanced system. They are engineered to handle a uniform load distributed evenly across both sides, which compresses the structure downwards.
When you remove the snow from one side, you create a powerful asymmetrical load. The remaining weight on the uncleared side is no longer counterbalanced. This introduces a dangerous twisting or torsional force on the entire truss system. The trusses are pushed sideways, a direction they have very little strength to resist. This can cause the connections at the peak or the eaves to fail, leading to a zipper-like collapse of the entire roof structure.
This risk is so significant that it is explicitly addressed in structural engineering standards. The National Building Code of Canada recommends designing gable roofs to withstand a scenario with zero load on one side and the full ground snow load on the other. However, older structures, or those built before modern codes, may not have this margin of safety. For this reason, you must always remove snow in a balanced manner, taking it off in strips from both sides of the roof peak to keep the load as even as possible.
Case Study: The Hidden Dangers in Canadian Semi-Detached Homes
The risk of asymmetrical loading is particularly acute in semi-detached homes and townhouses, common in places like Kelowna. When one neighbour diligently clears their half of the roof while the other does not, it places the shared central wall and connected roof structure under immense torsional stress. This scenario is made worse in modern open-concept renovations where integral support beams may have been removed. This unbalanced force on a shared structure has been a contributing factor to structural failures in Canadian townhouse complexes, where the truss system was not designed to handle such a significant one-sided load.
What is the minimum roof pitch required for snow to slide off naturally?
A roof’s ability to shed snow naturally is a key factor in passive snow load management. This capability is primarily determined by two factors: the roof pitch (its steepness) and the slipperiness of the roofing material. A steeper, slicker roof will shed snow much more effectively than a low-slope, rough-surfaced roof. There is no single “magic number” for pitch, as the ideal angle depends heavily on the material and the typical climate of the region.
Roof pitch is expressed as a ratio of rise (vertical distance) over run (horizontal distance). For example, a 6/12 pitch means the roof rises 6 inches for every 12 inches of horizontal run. As a general rule, pitches below 4/12 are considered low-slope and are very poor at shedding snow. They will accumulate snow and ice throughout the winter and almost always require manual removal to prevent dangerous load levels. Pitches of 6/12 and greater begin to shed snow more effectively, especially with smoother materials.
However, the material itself plays a huge role. A slick standing-seam metal roof can shed snow at a much lower pitch than a granular asphalt shingle roof. The rough texture of shingles creates significant friction, holding the snow in place. The following table, based on common Canadian building practices, outlines the recommended minimum pitches for natural snow shedding with different materials and in various climates.
| Roof Material | Region | Minimum Pitch for Natural Shedding | NBC Load Factor |
|---|---|---|---|
| Metal Roof | Dry Prairie Climate | 3/12 | Cs = 0.6-0.8 |
| Asphalt Shingles | Maritimes (wet snow) | 6/12 or greater | Cs = 1.0 |
| Standing Seam Metal | Southern Ontario | 4/12 | Cs = 0.7-0.9 |
| Composite Shingles | Quebec (ice prone) | 7/12 recommended | Cs = 1.0 |
As you can see, a homeowner in the Maritimes with an asphalt shingle roof needs a much steeper pitch (at least 6/12) to have any hope of natural shedding compared to someone with a metal roof on the Prairies. If your cottage has a low-slope roof (e.g., 4/12) with asphalt shingles, you must assume it will not shed snow on its own and incorporate regular, safe snow removal into your winter maintenance plan.
The snow removal clause that could leave you stranded for 3 days in January
For many cottage owners, especially those in areas like Muskoka or the Laurentians, property access is governed by contracts with private road associations or snow removal companies. While you might be diligent about your own roof, a clause buried in one of these agreements could leave you unable to access, or escape, your property during a major storm. It is imperative to read and understand the service level agreements (SLAs) in these contracts.
Many homeowners assume snow removal is an immediate service, but contracts often specify a response time. These can range from a guaranteed 24-hour clearing to, more commonly, a 48 or even 72-hour window following the end of a snowfall event. During a prolonged “1-in-50-year” storm, this means you could be snowed in for several days before a plow even arrives. This is a critical safety issue, especially in a medical emergency.
Case Study: Contractual Realities in Ontario Cottage Country
A review of typical private road and driveway clearing contracts in Ontario’s cottage country reveals a wide spectrum of service levels. During major winter events, snow removal companies are often overwhelmed. Many contracts include a force majeure clause, which legally exempts the contractor from fulfilling their obligations or paying penalties during “acts of God” or extreme weather events. This means that during the very storm where you need them most, your contractor may be legally absolved from showing up within the agreed-upon timeframe, leaving residents to fend for themselves.
This contractual risk extends to rental properties and condominiums as well. While landlords are generally responsible for structural elements like the roof, the specifics of driveway and walkway clearing are defined by the lease. Under Ontario’s standard lease agreements, these responsibilities can vary. Never assume who is responsible. Always verify the terms of your lease or condominium bylaws to understand your rights and obligations, and to know who to contact when snow becomes a hazard.
Do you really need snow guards to protect your gutters and pedestrians?
While natural snow shedding from a steep roof can be beneficial for managing load, it creates a new and significant hazard: the “roof avalanche.” A large mass of snow and ice sliding off a roof can destroy gutters, damage property below, and pose a lethal threat to anyone walking underneath. This is where snow guards become an essential safety system. These small devices are installed in a pattern across the roof surface to hold snow and ice in place, allowing it to melt and drain away safely rather than releasing in one catastrophic slide.
The primary function of snow guards is safety and liability mitigation. If you have a steep, slick roof (especially metal) that overhangs a walkway, driveway, or entrance, snow guards are not an optional accessory; they are a necessary safety feature. The legal and financial responsibility for any damage or injury is significant. This is a point that cannot be overstated.
If snow or ice falls from your roof and injures a person like a mail carrier or damages a neighbour’s property, you are responsible.
– Canadian liability insurance guidelines, Municipal by-law requirements for overhead protection
This liability extends to your insurance coverage. In the event of a claim for damage caused by falling snow, your insurer will investigate whether you took reasonable preventative measures. According to Quebec roofing contractors, insurance claims related to snow damage often require proof of regular maintenance and reasonable prevention efforts. Having snow guards installed on a high-risk roof is a clear demonstration of such effort. The cost of installing snow guards is minimal compared to the cost of replacing ripped-off gutters, repairing a damaged vehicle, or, most importantly, the immense liability of a personal injury claim.
The decision to install snow guards is a simple risk calculation. If your roof has the pitch and material to shed snow in large sheets, and if there is anything or anyone below that could be harmed, the answer is an unequivocal yes. They are a critical component of a comprehensive winter safety system for your property.
Key Takeaways
- Snow Density is Critical: The weight of snow, not its depth, is the primary structural risk. Wet spring snow is significantly more dangerous than dry winter powder.
- Balanced Loads are Non-Negotiable: Always remove snow evenly from both sides of a roof. Clearing one side creates a dangerous asymmetrical load that can trigger a collapse.
- Your House Gives Warnings: Sticking doors, new cracks around frames, and unusual groaning sounds are all signs of a structure under stress that demand immediate attention.
Why are massive icicles on your eaves a symptom of heat loss, not just weather?
Large, dramatic icicles hanging from the eaves are often seen as a picturesque part of a Canadian winter. In reality, they are a major warning sign of a costly and damaging problem: poor attic insulation and air sealing. Massive icicles are not primarily caused by weather; they are the result of heat escaping from your living space into the attic. This phenomenon is known as an “ice dam.”
It works like this: heat leaks into the unconditioned attic space, warming the underside of the roof deck. This causes the bottom layer of snow on the roof to melt, even when the outside air temperature is well below freezing. The meltwater runs down the roof surface until it reaches the cold eaves and gutters, which are not warmed by the escaping heat. There, the water refreezes, creating a “dam” of ice. As more water flows down, it backs up behind the dam, seeping under shingles, and leaking into your attic and walls, causing rot, mold, and significant structural damage.
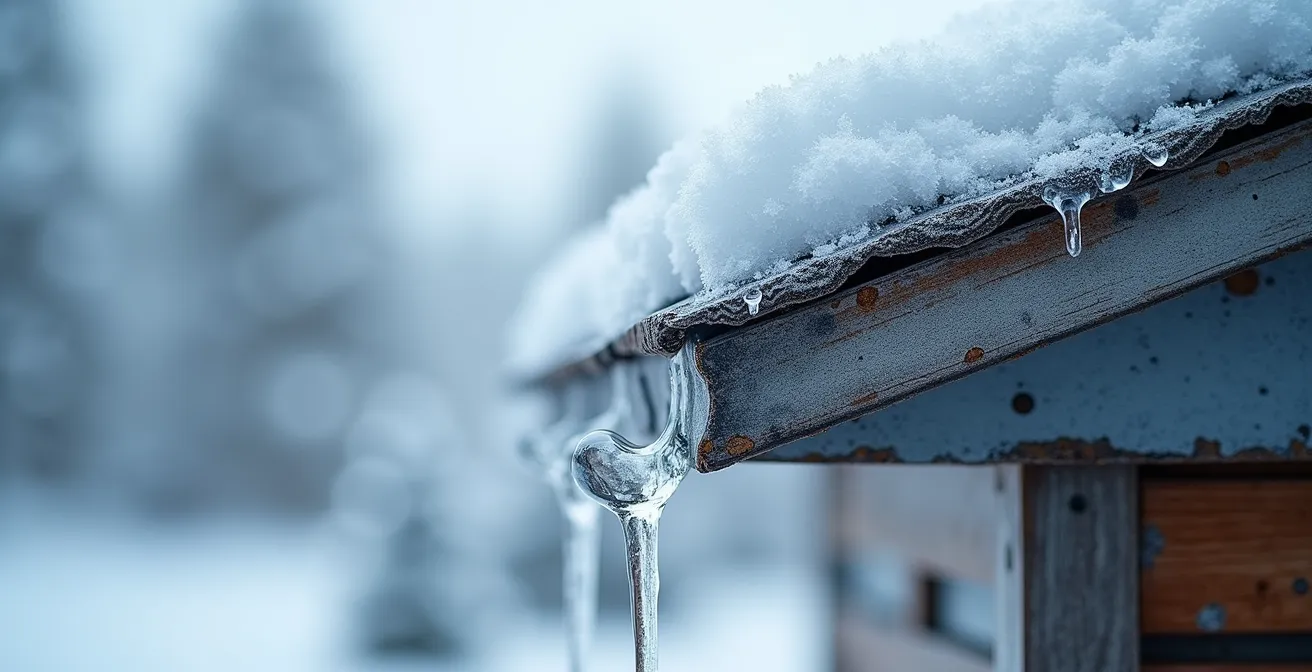
Therefore, those giant icicles are a clear visual indicator that you are paying to heat the outdoors. This “thermal bypass” is a symptom of an inefficient building envelope. The solution is not to knock off the icicles, but to fix the root cause in the attic. This involves two key steps: air sealing to block the pathways where warm air is escaping (around light fixtures, plumbing stacks, and attic hatches) and adding sufficient insulation to prevent heat transfer through the ceiling.
The Canadian government recognizes this as a critical energy efficiency issue and offers financial incentives to address it. Homeowners can receive an up to $1,800 grant available for attic insulation upgrades through the Canada Greener Homes Initiative. Investing in proper attic insulation not only prevents destructive ice dams but also significantly lowers your heating bills, paying for itself over time. If you see large icicles, don’t just see a winter decoration; see a sign that your home’s thermal protection is compromised.
Protecting your property is not about a single action, but about a system of informed observation and proactive maintenance. Use this guide as your winter safety framework to monitor your home’s structural health, understand the dynamic forces at play, and act decisively when necessary to ensure a safe and secure winter.
Frequently asked questions about roof snow and homeowner responsibility
Who is responsible for roof snow removal in a rental property?
In most Canadian provinces, landlords are responsible for structural maintenance including roof snow removal, while tenants handle walkways unless otherwise specified in the lease.
Can insurance deny a claim if I don’t remove snow promptly?
Yes, homeowner negligence clauses may allow insurers to delay or deny claims if you fail to clear your roof after municipal warnings or prolonged accumulation periods.
What recourse do tenants have if landlords don’t remove dangerous snow?
Tenants can contact municipal building inspectors, document the hazard, and may withhold rent in escrow if the situation poses immediate danger to health and safety.