The secret to a lifelong hardwood floor in Canada isn’t the price or country of origin; it’s mastering the physics of wood moisture against our extreme humidity swings.
- Wood must acclimate inside your home for at least 7-10 days to match the home’s unique moisture level, preventing future gaps.
- In our dry winters, engineered hardwood can be more prone to face-cracking than solid hardwood, which tends to shrink more predictably.
Recommendation: Invest in a whole-home humidifier integrated with your furnace. It’s the single most critical tool to protect your flooring from cracking during the “February Crisis” when indoor air is driest.
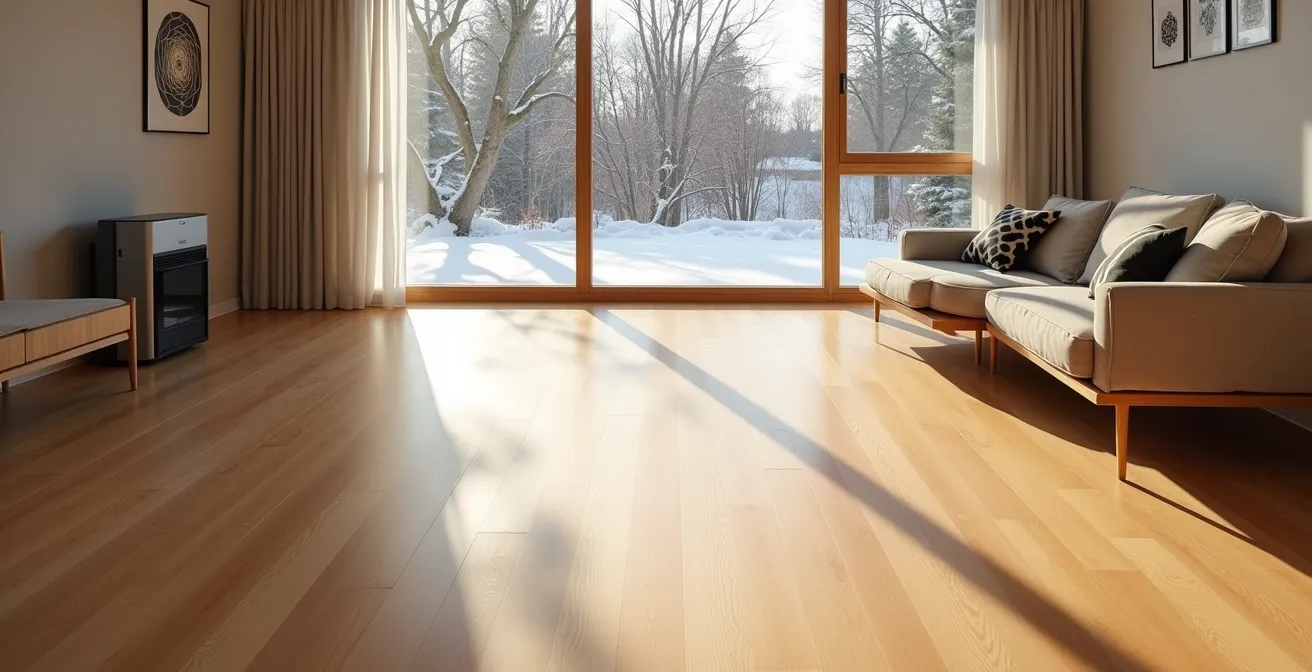
Every year, I see the same story. A homeowner spends a small fortune on beautiful, exotic hardwood flooring. It looks stunning for a few months. Then the first real Canadian winter hits. By February, unsightly gaps appear between the boards. By the second year, the finish is scratched, and some boards have started to crack or “cup.” The dream floor has become a constant, frustrating reminder of a costly mistake. Most people blame the dog, the kids, or the installer. They’re usually wrong.
When choosing a floor, the conversation often revolves around two things: colour and the Janka hardness scale. While hardness matters for resisting dents, it’s a dangerously incomplete metric for our climate. The real battle isn’t against dog claws and dropped toys; it’s a constant, invisible war against humidity. Wood is a hygroscopic material, meaning it acts like a sponge, constantly absorbing and releasing moisture to be in balance with the air around it. This causes it to expand and contract. In a country with humid summers and bone-dry, heated winters, this movement is extreme.
But what if the key to a floor that lasts 50 years wasn’t its hardness rating or its exotic origin, but how well its species and construction are suited to this dramatic seasonal shift? The truth is, locally-sourced woods like Canadian Maple and Oak are often superior not because they’re “harder,” but because their cellular structure is better adapted to our environment. They offer greater dimensional stability when managed correctly.
This guide isn’t about selling you a specific brand. It’s about giving you the knowledge I’ve gained over 20 years of installations. We’ll go beyond the showroom talking points to explore the science of wood acclimation, debunk myths about engineered floors, and reveal the critical role of humidity control. By the end, you’ll understand how to choose a floor that will not only survive but thrive for decades in a Canadian home.
To help you navigate these crucial decisions, this article breaks down the essential knowledge every Canadian homeowner needs. The following summary outlines the key topics we will cover to ensure your flooring investment is a lasting one.
Summary: A guide to choosing Canadian winter-proof hardwood flooring
- Why Red Oak is the minimum hardness standard for homes with big dogs
- How long must wood sit in your house before installation to prevent gaps later?
- Engineered or Solid: which one actually survives a radiant heated floor?
- The humidifier mistake that causes your new floor to crack in February
- Matte vs Gloss: which finish hides dust and scratches better for busy families?
- The “best house on the block” mistake that caps your appreciation potential
- How to replicate 100-year-old baseboards using modern CNC technology?
- Why open-concept modern homes often suffer from poor acoustics and how to fix it?
Why Red Oak is the minimum hardness standard for homes with big dogs
When you have a big dog, everyone tells you to get the hardest wood possible. They’ll point you towards Brazilian Walnut or other exotic imports with sky-high Janka ratings. While the Janka scale is a decent measure of how well a wood resists denting, it’s not the whole story, especially in Canada. For homes with large pets, I consider North American Red Oak to be the practical benchmark for durability. It offers a fantastic balance of hardness, resilience, and, most importantly, repairability.
Let’s be clear: no wood floor is indestructible. A 100-pound retriever’s claws will eventually scratch any finish. The advantage of a species like Oak is its strong, pronounced grain. This grain does a remarkable job of camouflaging the minor scratches and scuffs of daily life, something a smoother-grained wood like Maple doesn’t do as well. In terms of sheer hardness, a quality Canadian oak has a 1450 Janka rating, which is more than tough enough for residential traffic, pets included. It’s a workhorse.
Where Oak truly shines over many harder, imported exotics is its dimensional stability and predictable behaviour in our climate. It expands and contracts uniformly. Furthermore, its widespread availability and familiar properties mean that if a board gets deeply gouged or stained, it’s far easier to repair or replace than a rare tropical species. It’s a floor meant to be lived on, not just looked at. For homes with pets, that practicality is worth more than any number on a hardness chart.
How long must wood sit in your house before installation to prevent gaps later?
This is single-handedly the most skipped—and most critical—step in a lasting hardwood installation. You can’t just bring wood from a warehouse and nail it down. Every single plank needs to acclimate, which means letting it sit in the room where it will be installed until its internal moisture content reaches a balance with the environment. This is called reaching its moisture equilibrium. Forgetting this step is a guaranteed recipe for gapping in the winter and cupping or crowning in the summer.
So, how long is long enough? The generic answer is 48-72 hours, but for a Canadian home, that’s often dangerously insufficient. I tell my clients a minimum of 7 to 10 days. The wood should be unboxed and stacked with spacers between layers to allow air to circulate around every board. This process can’t be rushed. The goal is for the wood to match the “lived-in” humidity level of your home, not the conditions of the truck or warehouse it just came from.
A professional installer doesn’t guess; they measure. To ensure a perfect installation, it is vital to use a moisture meter to test both the hardwood planks and the subfloor. Ideally, the moisture content of the new flooring should be within 2-3% of the subfloor’s moisture content.
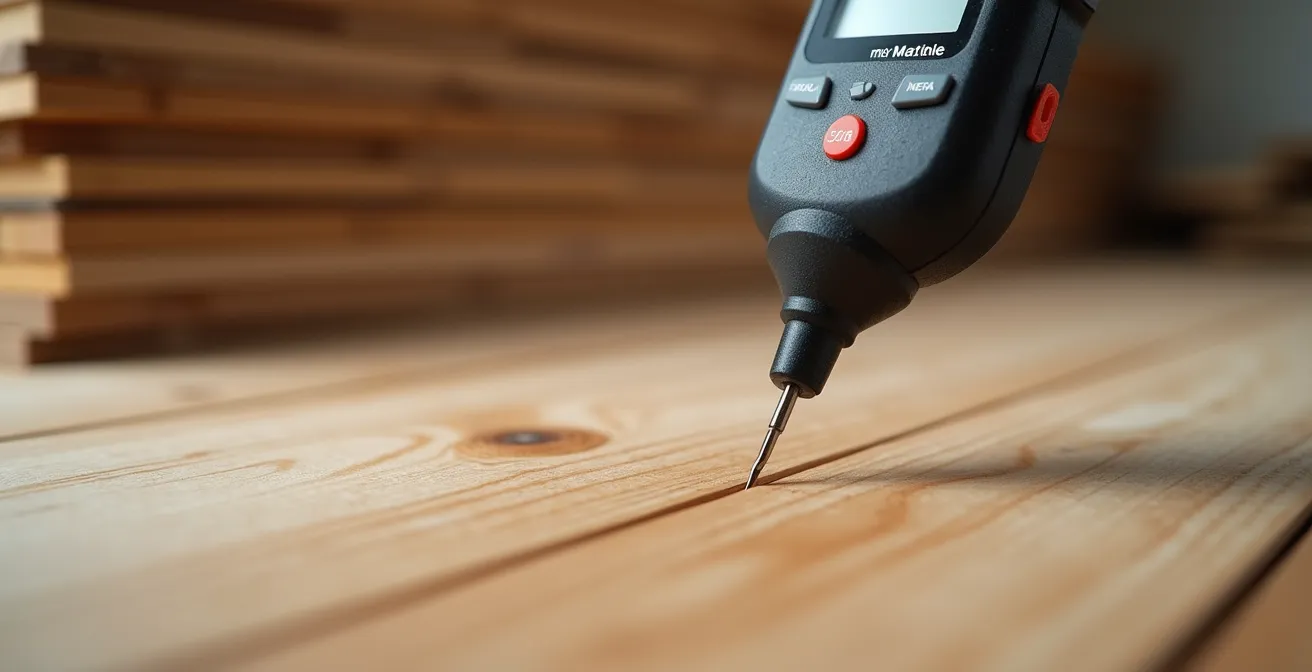
As you can see, this isn’t guesswork. The wood is physically adjusting to your home’s unique climate. Rushing this process is the number one cause of floor failure. Think of it as letting the wood breathe and settle in before you permanently fix it in place. That patience will be rewarded with a stable, beautiful floor for decades to come.
Engineered or Solid: which one actually survives a radiant heated floor?
Radiant in-floor heating is a wonderful luxury, but it’s also a torture test for any hardwood floor. The constant, direct heat accelerates moisture loss, which can cause wood to shrink, crack, and warp. The common wisdom is that engineered hardwood is the only safe choice over radiant heat. This is an oversimplification, and in the context of a dry Canadian winter, it can be misleading. The truth is more nuanced: the construction and quality of the specific product matter more than the category.
Engineered hardwood is made of a multi-layer plywood base with a solid wood veneer on top. This cross-ply construction gives it good dimensional stability against humidity swings, which is why it’s recommended for basements and condos. However, this same construction can be its weakness in an extremely dry environment, which is exactly what you get with radiant heat in a Canadian winter. As the experts at Gaylord Flooring point out, the different layers react to dryness differently.
Solid will shrink as a whole, while the top layer of solid wood on the engineered will shrink more than the plywood base causing the surface layer to crack.
– Gaylord Flooring technical experts, Understanding Relative Humidity guide
This means a cheap engineered floor can develop unsightly “face cracks” or “checks” in the top veneer, which are impossible to repair. A high-quality, thick-veneer engineered floor from a reputable manufacturer will perform much better. On the other hand, certain cuts of solid wood, specifically quarter-sawn solid hardwood, are surprisingly stable and can be used successfully over radiant heat, provided the system is run correctly and humidity is meticulously controlled.
| Feature | Solid Hardwood | Engineered Hardwood |
|---|---|---|
| Stability with heat | Quarter-sawn cuts offer good stability | Multi-layer construction provides excellent stability |
| Moisture response | Shrinks as whole unit when dry | Top layer may crack in extreme dryness |
| Recommended humidity | 30-50% year-round | 35-55% critical for preventing surface cracks |
The final verdict? Don’t just ask if it’s “engineered.” Ask about the veneer thickness, the manufacturer’s warranty for radiant heat, and commit to maintaining your home’s humidity. For radiant heat, a premium engineered product is often the safer bet, but it’s not a magic bullet against the laws of wood physics.
The humidifier mistake that causes your new floor to crack in February
I call it the “February Crisis.” It’s that point in late winter when we’ve had months of continuous heating, and the outdoor air is frigid and holds almost no moisture. When that cold, dry air is brought inside and heated, its relative humidity (RH) plummets to desert-like levels. In fact, when -12°C air is heated to a comfortable 21°C indoors, the RH drops to a shocking 6%. For your hardwood floor, this is a state of emergency.
At this critically low humidity, the wood releases its internal moisture into the dry air at an accelerated rate. This causes the wood fibres to shrink dramatically, leading to wide, ugly gaps between boards. In the worst cases, the stress can cause the wood itself to crack and split. Many homeowners think their small, portable room humidifier is enough to combat this. It isn’t. Those devices are designed for a single room and can’t possibly maintain a stable 35-45% RH level across an entire house, which is the minimum required to keep hardwood stable.
The only real solution is a whole-home humidifier. This unit integrates directly with your furnace and ductwork, adding a controlled amount of moisture to the air as it circulates. It treats the entire volume of your home’s air, creating a stable environment that protects not just your floors, but also your wood furniture, your skin, and even your respiratory health. It’s not a luxury; for a Canadian home with hardwood floors, it’s an essential piece of equipment.

Investing in a professionally installed flow-through or steam humidifier is the single best insurance policy you can buy for your hardwood floors. It’s the difference between a floor that looks old and damaged after one winter and one that remains tight and beautiful for a lifetime. Don’t make the mistake of underestimating the dryness of a Canadian winter.
Matte vs Gloss: which finish hides dust and scratches better for busy families?
Once you’ve settled on the wood species and construction, the final choice is the finish. This decision dramatically affects not just the look of your floor, but also its day-to-day maintenance. The debate usually comes down to matte versus gloss. For a busy family with kids, pets, and constant foot traffic, the answer is clear: a matte finish is your best friend.
A high-gloss finish acts like a mirror. While it can look incredibly glamorous in a showroom, in a real home it reflects every ray of light, which means it also highlights every single speck of dust, footprint, pet hair, and minor scratch. It’s a high-maintenance choice that requires constant cleaning to look its best. It shows everything. A matte finish, on the other hand, diffuses light rather than reflecting it directly. This simple optical trick makes it far more forgiving.
As flooring manufacturers themselves note, matte glosses help reduce the appearance of the marks left by daily life. Dust is less visible, and the small surface scratches that are inevitable in a family home don’t stand out as much because they don’t catch the light in the same jarring way. This means less time spent worrying about every little mark and more time simply enjoying your home. Most modern factory finishes also include an extremely hard aluminum oxide topcoat for scratch resistance, but even the best finish benefits from the forgiving nature of a low-sheen look.
Don’t confuse “matte” with “dull.” Modern matte and satin finishes have a soft, rich lustre that looks sophisticated and contemporary. They celebrate the natural beauty and texture of the wood itself, rather than covering it with a plastic-looking layer of high shine. For a floor that’s meant to be lived on, matte is the smart, practical, and stylish choice.
The “best house on the block” mistake that caps your appreciation potential
Hardwood flooring is consistently cited as an upgrade that adds resale value to a home. That’s true, but there’s a common mistake homeowners make: over-improving for their specific neighbourhood. Installing a rare, imported exotic hardwood that costs $25 per square foot might make your house the most luxurious on the block, but you will almost never recoup that investment. This is the “best house on the block” problem—your home’s value is ultimately capped by the comparable sales in your area.
A smarter strategy is to choose a high-quality, durable, and regionally appropriate flooring that elevates your home without wildly exceeding local market standards. This is another area where Canadian-sourced hardwood shines. A beautiful, professionally installed solid Canadian Maple or Red Oak floor is a premium feature that buyers recognize and value. It signals quality and durability without being an unnecessary extravagance that inflates your price beyond what the market will bear.
The real long-term value of hardwood isn’t just in its initial beauty, but in its longevity. Quality solid Canadian hardwood can be sanded and refinished multiple times, effectively giving the floor a new life every 10-15 years. This longevity is a powerful selling point. Instead of spending your budget on a fragile, expensive import, invest in a quality local product and a flawless installation. That combination—classic appeal, proven durability, and the promise of a long lifespan—is what truly maximizes your home’s appreciation potential without pricing you out of your own neighbourhood.
How to replicate 100-year-old baseboards using modern CNC technology?
When restoring a century home, one of the biggest challenges is dealing with the trim. The original baseboards in older Canadian homes often have intricate profiles and a substantial height that you simply can’t find on the shelf at a big-box store. Tearing them out and replacing them with generic modern trim can strip a room of its character. The good news is that you don’t have to. Using modern technology, we can replicate those historic profiles perfectly.
The process starts with a clean cross-section of the original baseboard. Even a small, 2-inch piece is enough. This sample is then scanned using a digital profiler, which creates a highly accurate 2D computer file of its unique curves and details. That digital file becomes the blueprint for the replication. It’s a perfect digital copy of the original craftsman’s design.
From there, the file is sent to a CNC (Computer Numerical Control) router. This machine uses the digital blueprint to guide a custom-made router bit, carving the exact historical profile into new, straight lengths of wood stock. We can use modern, stable materials like MDF for a paint-grade finish, or run the profile on a solid wood like Poplar or even Oak to match a stained finish. The result is a brand-new baseboard that is an identical twin to the 100-year-old original. This allows you to seamlessly patch repairs, run matching trim into a new addition, or replace an entire room’s worth of damaged baseboards while preserving the home’s authentic architectural integrity.
Key takeaways
- Master Your Humidity: The single biggest threat to hardwood in Canada is not wear and tear, but the extreme humidity swing from summer to winter. A whole-home humidifier isn’t a luxury; it’s essential.
- Choose Canadian for Stability: Locally sourced woods like maple and oak are often better choices than exotics because their structure is better suited to our climate’s demands, offering superior dimensional stability.
- Your Finish Should Match Your Life: For busy homes with kids and pets, a matte or satin finish is far more practical than high-gloss, as it effectively hides minor scratches, dust, and daily imperfections.
Why open-concept modern homes often suffer from poor acoustics and how to fix it?
Open-concept layouts are a hallmark of modern Canadian homes, creating bright, airy spaces. However, they come with a significant downside that is often overlooked until you move in: poor acoustics. When you remove walls, you also remove the barriers that absorb and break up sound waves. Hard surfaces like drywall, large windows, and, yes, hardwood flooring, act like mirrors for sound. In a large, open room, this causes sound to bounce around endlessly, creating echo, reverberation, and an unpleasantly loud environment where conversations and TV noise carry everywhere.
While hardwood floors contribute to this issue due to their reflective surface, they can also be part of the solution. The installation method itself plays a role. A “floating” floor installation, common with engineered products, can sometimes create a slight cavity that acts like a drum, amplifying footfall noise. A glue-down installation, by contrast, creates a solid bond with the subfloor, which helps to deaden sound transfer.
However, the most effective fix involves adding materials specifically designed for sound absorption. This doesn’t mean you have to carpet your beautiful new floors. The solutions can be both practical and stylish. Adding large area rugs in seating areas, hanging heavy drapes, and incorporating upholstered furniture are the first and easiest steps. For a more integrated solution, you can address the floors and walls directly during the renovation process.
Action plan: Taming echo in your open-concept home
- Install an Acoustic Underlayment: Before the flooring goes down, install a high-quality acoustic underlay. Ensure it meets the specific STC (Sound Transmission Class) and IIC (Impact Insulation Class) requirements mandated by many Canadian condo boards.
- Choose a Glue-Down Installation: Where possible, opt to adhere the flooring material directly to the subfloor. This reduces reverberation and impact noise compared to a floating installation.
- Add Soft Surfaces to Walls: Don’t just focus on the floor. Installing wood slat walls with acoustic felt backing or even large fabric art panels can absorb a significant amount of mid- and high-frequency sound.
- Strategic Use of Area Rugs: Place thick area rugs with dense pads in key zones like the living room and dining area. This absorbs sound at the source and defines the spaces visually.
- Incorporate “Soft” Decor: Use upholstered furniture, bookshelves filled with books, and fabric window treatments instead of hard blinds to further absorb stray sound waves.
Now that you have the knowledge of a pro, you can demand these standards from your supplier and installer. By focusing on moisture management, a species suited to our climate, and an installation method that respects the physics of wood, you ensure your investment is protected for the long haul.