
The comfort of your home depends less on the R-value printed on insulation packaging and more on how the entire building envelope functions as a single, airtight system.
- Hidden thermal bridges in your walls and attic can negate up to 33% of your insulation’s effectiveness.
- Uncontrolled air leakage, often through seemingly minor gaps like an attic hatch, is a primary driver of heat loss and high energy bills.
Recommendation: Shift your focus from simply adding insulation to identifying and eliminating thermal bridges and air leaks throughout your home’s entire envelope.
For many Canadian homeowners, it’s a frustratingly familiar story: you invest thousands in upgrading your attic or wall insulation, expecting a cozy home and lower heating bills, only to find you’re still reaching for a sweater indoors and staring at a stubbornly high energy bill. The common advice to “just add more insulation” treats the symptom, not the disease. The belief that a higher R-value is a silver bullet for a cold house is one of the most pervasive and costly myths in home performance.
The reality is that your house operates as a complete system, known as the building envelope. Heat doesn’t just move through materials; it’s carried away by air currents and bypasses insulation through structural “superhighways.” A focus solely on the R-value of insulation (a measure of resistance to conductive heat flow) ignores the far greater impact of heat loss through air leakage (convection) and structural weak points (thermal bridging). These are the invisible thieves robbing your home of its warmth.
This guide moves beyond the platitudes. We will delve into the building science principles that explain why your expensive insulation might be underperforming. We’ll explore how to identify these hidden energy drains, from compressed batts to thermal bridges in your walls, and outline the strategic upgrades that deliver genuine comfort and efficiency, transforming your home from a drafty box into a truly high-performing Canadian shelter.
For those who prefer a visual format, the following video highlights common on-site mistakes that can compromise a home’s performance, offering a practical look at the details that separate amateur work from professional results.
To help you navigate these critical concepts, this article is structured to build your understanding systematically. We will deconstruct common insulation failures and then provide the strategic solutions to build a truly efficient building envelope.
Summary: A Building Science Guide to a Warmer Home
- Why fiberglass batts lose 40% of their R-value when compressed by wiring
- How to interpret a thermal camera report to find invisible heat leaks
- Exterior vs Interior insulation: which strategy eliminates thermal bridging best
- The attic hatch mistake that sucks heat out of your house like a chimney
- How to balance large windows with energy codes without failing inspection
- How to find the hidden studs that are leaking heat right through your walls
- Why adding insulation without improving soffit venting makes ice dams worse
- How to upgrade your attic insulation to R-60 to stop ice dams permanently
Why Fiberglass Batts Lose 40% of Their R-Value When Compressed by Wiring
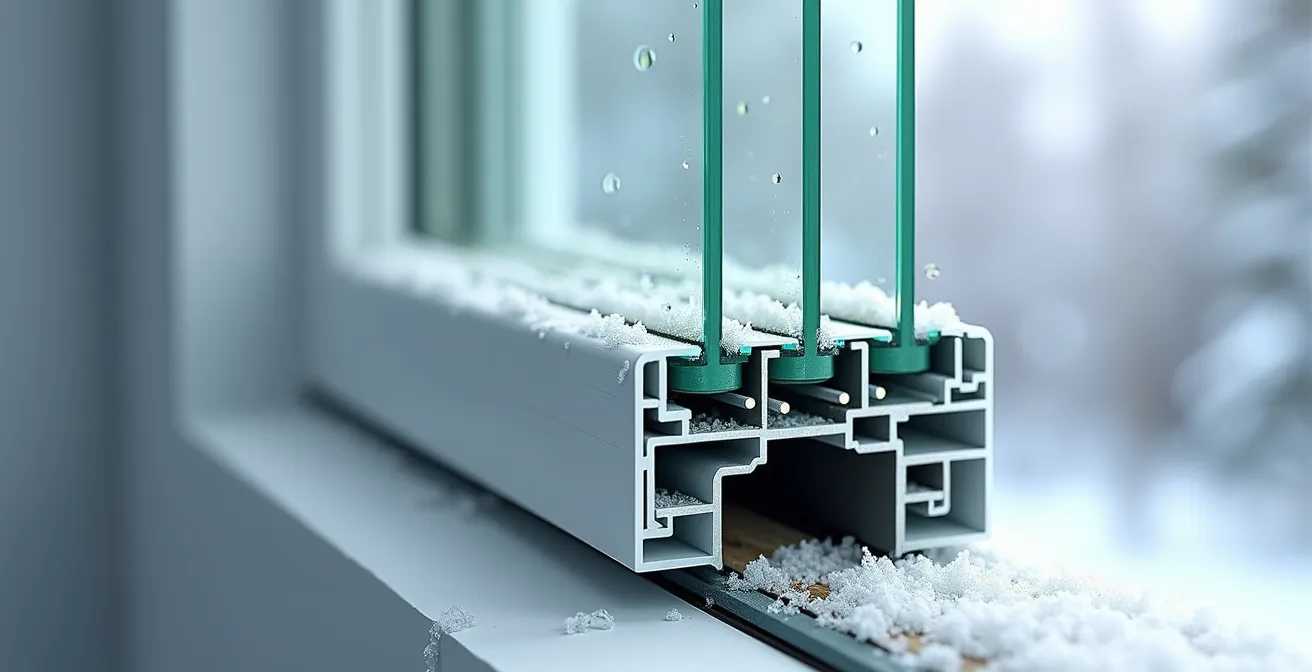
One of the most significant disconnects between theory and reality occurs within your walls. You purchase R-19 or R-20 fiberglass batts, but you rarely ever achieve that level of performance. This isn’t a product flaw; it’s an installation failure. Fiberglass insulation works by trapping air in tiny pockets. When it’s compressed—jammed behind electrical boxes, forced around plumbing pipes, or stuffed tightly around wiring—those air pockets are crushed, and its ability to resist heat flow plummets. The insulation’s “installed R-value” becomes a fraction of its “nominal R-value.”
This isn’t a minor effect. Research from the Oak Ridge National Laboratory is revealing, showing that in a standard wall cavity, a batt rated at R-19 can perform as low as an actual R-value of R-12.8, a 33% reduction in performance due to framing and installation imperfections. A university study comparing identical homes took this further, demonstrating that R-12 foam-insulated walls, which are air-impermeable, used half the energy of R-20 fiber-insulated walls. This proves that preventing air movement and ensuring full loft is often more critical than the rated R-value itself.
Poor installation that compresses insulation creates pathways for convective looping, where air circulates within the wall cavity, carrying heat from the warm side to the cold side and bypassing the insulation entirely. To prevent this, every batt must be meticulously cut to fit perfectly within its cavity, split to go around wires without compression, and fitted snugly around electrical boxes. Anything less is simply wasting money on underperforming material.
Contractor Vetting Checklist: Ensuring Proper Insulation Installation
- Ask: How do you ensure full insulation loft around electrical boxes and wiring runs?
- Verify: Do you cut batts to fit precisely or compress them into cavities?
- Check: Will studs be framed 600mm (24 in.) on centre to optimize insulation spacing and reduce thermal bridging?
- Confirm: How do you handle compression points at plumbing stacks and HVAC runs?
- Request: Photos of previous installations showing their detailing around wires and boxes.
How to Interpret a Thermal Camera Report to Find Invisible Heat Leaks
The most powerful tool for diagnosing a cold house is an infrared (IR) or thermal camera. It translates heat into a visible spectrum of light, making the invisible world of heat loss stunningly clear. While often part of a professional energy audit, understanding how to read a thermal image empowers you to see your home through the eyes of a building scientist. The key is to look for sharp contrasts and patterns, which indicate a thermal discontinuity or, more simply, a weak point in your building envelope.

As seen in the image, a thermal camera reveals a story that the naked eye cannot. On a cold Canadian winter day, a properly insulated wall should appear as a uniform, cool colour (blue or purple). The problems appear as warmer colours (yellow, orange, or red):
- Vertical Stripes: Yellow or orange stripes appearing every 16 or 24 inches on a wall are the tell-tale sign of thermal bridging through wooden studs.
- Bright Hotspots: Bright red or white spots often indicate significant air leakage. Common culprits include unsealed electrical outlets, gaps around window frames, and, most critically, the rim joist area between floors.
- Cold Patches: Conversely, large, dark blue areas around windows or doors show where cold outside air is infiltrating your home.
An IR camera report is your roadmap for strategic air sealing and insulation improvements. It moves you from guessing to knowing, allowing you to target the exact locations where your home is bleeding energy. Instead of blindly adding more insulation everywhere, you can focus your efforts on the specific junctions and pathways that offer the biggest return on investment for comfort and energy savings.
Exterior vs Interior Insulation: Which Strategy Eliminates Thermal Bridging Best
Once you’ve identified thermal bridging as a major problem, the next question is how to solve it. While adding insulation to the interior stud bays is the conventional approach, it fundamentally fails to solve the problem of the studs themselves. The wood framing still acts as a bridge for heat to bypass the new insulation. The most effective, albeit more expensive, solution is to add a continuous layer of rigid insulation to the exterior of the building. This strategy creates a thermal break, effectively wrapping your home in a seamless, insulated blanket.
This approach keeps the entire wall structure, including the studs, on the warm side of the insulation, eliminating the temperature differential that drives heat loss. The following comparison, based on data from building science experts, highlights the dramatic difference in performance as outlined in a recent comparative analysis.
| Aspect | Exterior Insulation | Interior Insulation |
|---|---|---|
| Thermal Bridge Reduction | 95-100% elimination | 0% (bridges remain) |
| Installation Cost | $15-25/sq ft | $5-10/sq ft |
| Wall Assembly R-Value | R-30+ achievable | R-13 effective (R-19 nominal) |
| Moisture Protection | Keeps structure warm & dry | Risk of condensation in walls |
| Living Space Impact | No interior disruption | Reduces room dimensions |
| ROI Period | 7-10 years | 3-5 years |
While interior insulation offers a lower upfront cost and quicker ROI, it’s a compromise that leaves the primary weakness—thermal bridging—unaddressed. Exterior insulation is a more comprehensive, long-term solution that not only dramatically reduces heating costs but also protects the structural integrity of your home by preventing condensation within the wall cavities. For new builds or major renovations in Canada, adding a layer of exterior rigid foam is one of the single most effective strategies for creating a high-performance building envelope.
The attic hatch mistake that sucks heat out of your house like a chimney
In the complex system of your home’s envelope, sometimes the biggest problems are the most overlooked. The attic hatch is a prime example. While you may have blown R-60 insulation across your entire attic floor, a standard, uninsulated attic hatch made of thin plywood is a massive thermal hole in your ceiling. Warm, moist air from your living space, driven by the stack effect (the tendency of warm air to rise), flows relentlessly through the gaps around the hatch. This creates a powerful convective loop that wastes energy and can lead to moisture problems in your attic.
The scale of this heat loss is staggering. As Natural Resources Canada points out in their authoritative guide, this single weak point is a major energy drain. They state:
An uninsulated 2×3 foot attic hatch in -20°C winter loses as much heat as 50 feet of uninsulated wall.
– Natural Resources Canada, Keeping the Heat In Guide
This is not just an insulation problem; it’s an air-tightness problem. The solution requires a two-pronged approach: insulating the hatch itself to a high R-value and, just as importantly, weather-stripping it to create an airtight seal. A properly treated attic hatch should be as robust as a miniature, well-insulated exterior door. Anything less is an open invitation for heat to escape your home.
Your Action Plan for an Insulated Attic Hatch
- Build a 2×6 wood frame ‘dam’ around the hatch opening, extending at least 12 inches high to hold back the surrounding ceiling insulation.
- Apply high-quality foam weatherstripping to the top edge of the dam or the hatch itself to create an airtight seal when closed.
- Attach at least two layers of 2-inch rigid foam board (totaling R-20) to the top side of the hatch door.
- Install secure latches or clasps that can pull the hatch down tightly onto the weatherstripping, ensuring a firm and continuous seal.
- Test the seal after installation with an incense stick or smoke pencil on a cold, windy day to visually confirm that no air is being drawn into the attic.
How to balance large windows with energy codes without failing inspection
Large, expansive windows are a hallmark of modern architecture, but in a cold climate like Canada’s, they present a significant building science challenge. A standard double-pane window might have an R-value of just R-2, compared to the R-20 of the surrounding wall. Prescriptive building codes often limit the total window-to-wall ratio to prevent excessive heat loss. So how do architects design homes with vast glass walls without violating energy codes? The answer lies in the “performance path” approach to compliance.
Instead of following a rigid checklist of R-values for each component, the performance path allows builders to use energy modeling software to demonstrate that the *overall* annual energy performance of the house meets or exceeds the code’s target. This provides flexibility. You can have a larger window area if you compensate for it by dramatically improving the performance of the windows themselves and other components of the envelope. As one case study on modern Canadian homes shows, this is achieved by specifying extremely high-performance windows—typically triple-pane, argon-filled units with multiple low-emissivity (low-e) coatings. These advanced windows can achieve R-values from R-5 to R-7 or even higher, more than triple the performance of a standard window.
The performance path embodies the core principle of systems thinking. It acknowledges that the building envelope is a sum of its parts. By investing in superior window technology, builders can achieve the desired aesthetic of large glass areas while still creating a highly energy-efficient home that passes inspection. For homeowners, this means that the quality and specifications of your windows are just as important as their size. Opting for triple-pane technology is a crucial strategy for balancing natural light with thermal comfort in the Canadian climate.
How to find the hidden studs that are leaking heat right through your walls
The most common form of thermal bridging in a Canadian home is the wood framing inside your walls. Wood is a significantly poorer insulator than the insulation filling the spaces between it. A typical wood stud has an R-value of about R-1 per inch, meaning a 2×6 stud has an R-value of roughly R-6. In stark contrast, the insulation in the cavity beside it might be R-20. According to building science data, in standard Canadian 2×6 construction, about 25% of your total wall area is solid wood. This means one-quarter of your wall is performing at a drastically lower R-value, creating thermal “superhighways” for heat to escape.
So, how can you spot this hidden problem without a thermal camera? One common, low-tech sign is known as “ghosting.” This phenomenon appears as faint, vertical grey lines on interior walls, perfectly spaced where the studs are located. It’s caused by dust particles in the air sticking to the colder surfaces of the wall—the surfaces directly over the studs that are chilled by the outside air. If you see these faint stripes, you’re seeing a physical map of where your home is losing heat.
While you can’t easily eliminate the studs in an existing home, understanding this concept is crucial for renovations or new construction. High-performance building techniques, known as advanced framing, are designed specifically to minimize this effect. These include spacing studs at 24 inches on-center instead of 16 (reducing the amount of wood by about 30%), using staggered-stud walls, or employing systems like the Larsen Truss to create a deeper wall cavity with a complete thermal break. Recognizing that studs are a weak link is the first step toward designing and building a more robust wall system.
Why adding insulation without improving soffit venting makes ice dams worse
Here we encounter one of the most counter-intuitive principles in building science: sometimes, adding insulation can make a problem worse if not done as part of a system. This is especially true with ice dams in a Canadian winter. Ice dams form when the upper part of a roof becomes warm enough to melt snow, but the eaves remain below freezing. The meltwater runs down the roof and refreezes at the edge, creating a “dam” of ice that backs up water under the shingles, causing leaks and significant damage.
The primary cause of a warm roof deck is heat escaping from the house into the attic. When you add a thick blanket of insulation to your attic floor without first meticulously air-sealing all the leaks from the house below (around pot lights, plumbing stacks, attic hatch), you effectively trap more heat in the attic. Furthermore, if you don’t ensure there is adequate ventilation from the soffits at the eaves to the vents at the roof’s peak, this trapped warm air has nowhere to go but up against the underside of the roof sheathing.
A memorable “beer cooler analogy” is often used to explain this. A super-insulated attic with poor ventilation acts like a high-quality cooler left in the sun. The insulation keeps the heat in, and the attic space gets progressively warmer, heating the roof deck and accelerating snow melt. A well-ventilated attic, by contrast, allows cold exterior air to continuously flush out any heat that leaks in, keeping the entire roof deck uniformly cold and preventing melting in the first place. Therefore, a successful attic upgrade is a three-part process: air seal first, then ensure proper ventilation, and only then add insulation.
Key Takeaways
- Your home’s comfort is dictated by the performance of the entire building envelope, not just the R-value of its insulation.
- Air leakage and thermal bridging are the primary, often invisible, culprits behind high heating bills and cold rooms.
- Effective solutions require a systematic approach: air seal first, address thermal breaks, ensure proper ventilation, and then insulate to the correct level.
How to upgrade your attic insulation to R-60 to stop ice dams permanently
To permanently solve issues like ice dams and drastically improve your home’s comfort, upgrading your attic requires a holistic approach that culminates in a deep layer of insulation. For most Canadian climate zones, the target has evolved. While R-50 was once the standard, today NRCan recommends R-60 as the gold standard for new construction and major upgrades, providing a robust thermal barrier against extreme cold. This typically translates to about 20-22 inches of loose-fill cellulose or fiberglass insulation.
However, simply blowing in more insulation is the *last* step of the process. As we’ve established, without controlling for air leakage and ventilation, this new insulation will underperform and can even exacerbate moisture problems or ice damming. The preparatory work is what separates a successful, high-performance attic from a failed one. It’s about creating a perfectly airtight and well-ventilated foundation *before* the insulation is installed. This non-negotiable prep work ensures that the only heat transfer occurring is slow, controlled conduction, which the R-60 insulation is designed to stop.
This systematic process transforms your attic from a major source of energy loss into one of your home’s strongest assets, effectively decoupling your indoor environment from the harsh Canadian winter. It’s the ultimate expression of treating the house as a complete and interconnected system.
Pre-Insulation Attic Preparation Checklist for Canadian Homes
- Air-seal all ceiling penetrations with fire-rated sealant, focusing on gaps around pot lights, plumbing stacks, and electrical wiring.
- Build a robust, insulated dam around the attic hatch and ensure it seals tightly with weatherstripping (target a minimum of R-40 for the hatch itself).
- Install ventilation baffles (rafter vents) in every joist bay, ensuring a clear path for air to flow from the soffit vents up into the attic space.
- Identify and have a licensed electrician remediate any old knob-and-tube wiring, as it cannot be buried in insulation.
- Mark and protect all recessed light fixtures, ensuring they are IC-rated (Insulation Contact rated) before they are covered.
- Check that all bathroom and kitchen exhaust ducts are insulated and vent directly to the outside, not into the soffit or attic space.
By shifting your perspective from merely adding insulation to strategically managing the entire building envelope, you can finally address the root causes of a cold house. The next logical step is to commission a professional energy audit, including a blower door test and thermal imaging, to create a data-driven roadmap for transforming your home’s performance.
Frequently Asked Questions About Home Insulation and Heat Loss
What is ‘ghosting’ on walls?
Ghosting appears as faint vertical lines on walls, especially visible on dewy mornings. It’s dust collecting on colder surfaces caused by thermal bridging through studs, which conduct heat out of the house more quickly than the insulated cavities.
How much heat do I lose through studs?
Wood studs conduct heat about three times faster than standard insulation. Since studs can make up 25% of your wall’s surface area, it’s like having one entire wall in your home with almost no insulation, creating a significant pathway for heat loss.
What are advanced framing solutions?
Advanced framing techniques are methods used in construction to reduce thermal bridging. Options include spacing studs at 24 inches on-center (which reduces the amount of wood by 30%), building staggered-stud walls, or using a Larsen Truss system, all of which are common in high-performance Canadian construction to create a more thermally efficient wall.